If you are interested in migrating from a legacy infrastructure to a container-based approach, Kubernetes is a good choice for orchestrating your future fleet of containers. You can even deploy Kubernetes in air-gapped environments.
In an earlier post, we compared several competing orchestration systems. Judging by the GitHub repository activity, GitHub stars, and number of contributors, Kubernetes is currently the most actively developed and feature-rich framework available:

In this technical overview, we’ll showcase the flexibility of Kubernetes, and demonstrate how Kubernetes allows you to keep all infrastructure as code.
Getting Started with Kubernetes
Kubernetes can be installed in a bare-metal environment or on public clouds like AWS, Azure, and GCP. To run all of the described Kubernetes operations in your test cluster as we illustrate in this post, refer to our quick single master installation tutorial. Alternately, you can install a local development cluster with Minikube.
After installing Kubernetes, your cluster is ready to run the sophisticated topologies and workloads that are available in Kubernetes.
All resources, settings, and objects in a Kubernetes cluster are described with YAML files declaratively. After submitting your “desired state” YAML configurations to cluster API (either using official CLI tool “kubectl”, executing “kubectl create your-file.yaml”, or using any of the available SDKs), the cluster will try to create and configure needed resources and monitor their state to meet your requirements. Later in this post, we will provide links to several interesting examples of YAML configurations on GitHub.
Evaluating Deployment Models
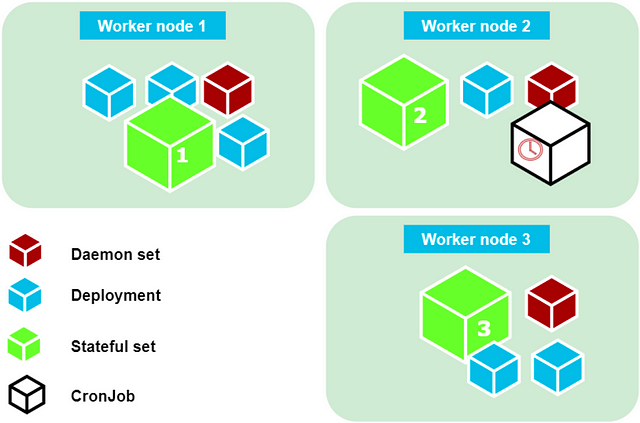
There are several available workload deployment options:
- Single “pod”: one or several containers running on the same machine; no auto-scaling.
- Replica set: a pod definition that can be scaled up or down manually or via an auto-scaler resource; the auto-scaler must also be created from a YAML file.
- Deployment: highest-level abstraction that creates replica sets and allows roll back to previous version after deployment; supports rolling upgrades of pods.
- Stateful set: intended for databases, Elasticsearch, or other similar stateful services where single-node identity must be preserved between upgrades, scaling up and down, or recovery. It assigns unique pod names to members (and service DNS addresses), and then creates members in strict order one after another. This option allows for initialization of database clusters and maintenance of stable operations of any other stateful service.
- Daemon set: a pod definition that runs single replica on each worker node in the cluster; intended for helper utilities like log collectors. (For example, we need a single log collector on every machine in the cluster.) The network plugin we just deployed (Weave) uses a daemon set, as we seen earlier (“daemon set weave-net created”).
- Jobs and CronJobs: simple run-once pods, or scheduled pods, that run until “completion”, should be used as “Jobs”. Batch Jobs can be run from a template; this is a new feature.
Host-Based and Path-Based Routing and Load Balancing
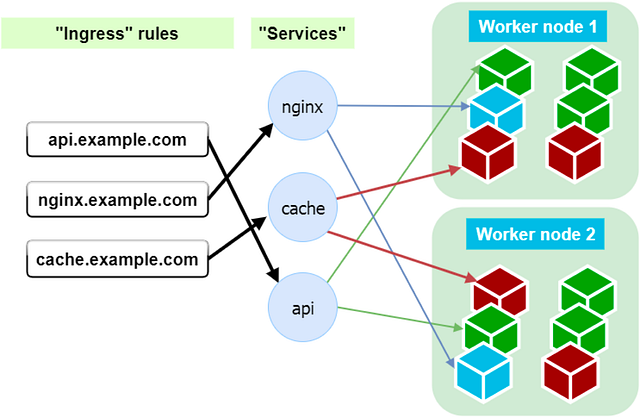
In addition to deployment options, we have routing and load balancing resources:
- Service: a load balancer for any pod, regardless of whether the pod was deployed using Stateful Set, as Deployment, or Replica set. A Service can route the traffic and load balance between any chosen pods by label.
- Ingress: a set of rules to route traffic to a particular Service based on DNS host name or URL path. The diagram above illustrates three DNS names being routed (each to its special service), to further load balance incoming traffic among all available healthy pods.
Handling Sensitive Information and Container Configurations
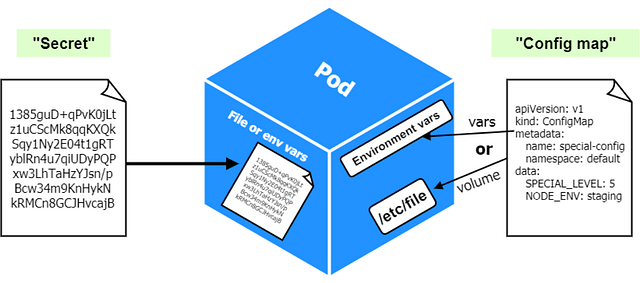
Another important feature is the ability to inject configuration options, secrets, and credentials into containers:
- Config Maps: a set of values that can be mapped to a pod as “volume” (to access all config map items as files) or passed as environment variables.
- Secrets: similar to config maps, secrets can be mounted into a pod as a volume to expose needed information or can be injected as environment variables. Secrets are intended to store credentials to other services that a container might need or to store any sensitive information.
Implementing a Simple Distributed Application Scenario
Let’s implement a simple distributed application scenario to explore the ingress, deployment, and service features:
- We have two websites. Both must be highly available and distributed on several worker nodes. In the event we power off one node, no website should experience any downtime. We will use a Service to load balance, and traffic will be routed by Ingress rules.
- Depending on the accessed DNS name of the website, “blue.mywebsite.com” will display a blue website, and “green.mywebsite.com” will display a green website. We will run two different container images: one with green website content and the other with blue website content.
The docker containers for this tutorial have already been created and uploaded to dockerhub.com for your convenience. Simply wrap the docker containers into Kubernetes deployment YAMLs, and configure routing and replication.
First, verify that you have at least two connected worker nodes, and ensure they have network access to each other. This step is necessary because ingress routing will sometimes redirect our requests internally from one node to another if the required pod doesn’t exist on a host which our request just hit.
Run “kubectl get nodes” to see the active nodes. The status should be indicated as “Ready”:

Create two files (“blue-website-deployment.yaml” and “green-website-deployment.yaml”) with the following content. Replace ‘blue’ for ‘green’, respectively, in each file:
apiVersion: apps/v1beta1
kind: Deployment
metadata:
  name: blue
  namespace: default
spec:
  replicas: 5
  template:
    metadata:
      labels:
        name: blue
    spec:
      containers:
      - name: blue-website
        image: aquamarine/kublr-tutorial-images:blue
        resources:
          requests:
            cpu: 0.1
            memory: 200
These files instruct Kubernetes to do the following:
- Create a replica set of 5 pods using docker image “aquamarine/kublr-tutorial-images:blue”.
- Place them on worker nodes. Note that each single replica will need at least 200Mb memory and 10% of 1 CPU core.
If the node is busy and doesn’t have the resources available, it will avoid placing the container on that node. This allows us to pack more containers per machine and, at the same time, reserve the needed minimum or maximum resources. In addition to “resources.requests”, there is also “resources.limits” which will cause a pod to become a candidate for eviction if it consumes more than a limit. Eviction happens when a worker node has no more resources to run system services.
To launch the deployment, run “kubectl create -f blue-website-deployment.yaml”. Run this again for the green deployment file.
Next, check to confirm creation by running “kubectl get deployments”. Success will return this status:

We have successfully launched 10 containers!
To see all pods, run “kubectl get pods”:
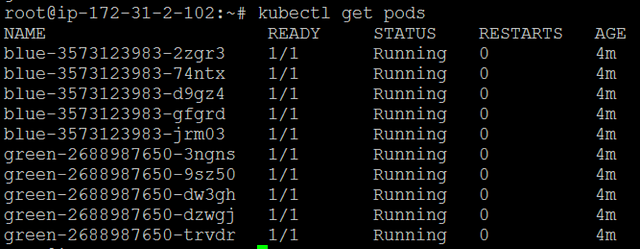
Pay attention to the Restarts column: when something goes wrong during container startup phase and the main process quits, the pod will be restarted. (If not specified otherwise explicitly in the pod template, this is the default behavior.) By monitoring the Restarts column you will instantly discover failing pods. Sometimes your containerized application can run stable for some time, and then crash. You can notice such issues when you see the restarts number suddenly become high. In production, of course, you should have the alerts notify you based on logs and metrics.
Creating a Service Definition
At the moment, our containers cannot be reached from outside despite the fact that each pod has its own internal IP. Without a service the external traffic can’t reach those pods by hitting the host machine “IP:Port”. We will create a service definition and submit it the same way we did a deployment. Copy the following content to a file named “two-website-services.yaml”:
apiVersion: v1
kind: Service
metadata:
  name: green-website
spec:
  ports:
  - port: 80
    targetPort: 80
    protocol: TCP
    name: http
  selector:
    name: green
---
apiVersion: v1
kind: Service
metadata:
  name: blue-website
spec:
  ports:
  - port: 80
    targetPort: 80
    protocol: TCP
    name: http
  selector:
    name: blue
In this example, we concatenated both definitions in one file using a YAML --- separator to indicate a start of a new definition. You can place all kind of resources in the same file. In addition, you don’t have to run kubectl create -f for each file separately. Instead, you can point to a folder, and it will submit all YAML files found in that folder. Submit this file, and verify it was created by running kubectl get services:

Here is what we told Kubernetes to do using the two service definitions:
- Each service has its own internal IP, unless you explicitly created a “headless” service with no IP. (This is rare, but can be used with Stateful Sets, to force pods to spread across nodes and avoid having all replicas mistakenly on the same node just because the node had the capacity to run all replicas.)
- The port setting is service port. “targetPort” is the container target port where we send traffic. Most importantly is the “selector” setting: this is the label by which we select pods to send traffic to. Here is the label we earlier specified in our “deployment” manifest:
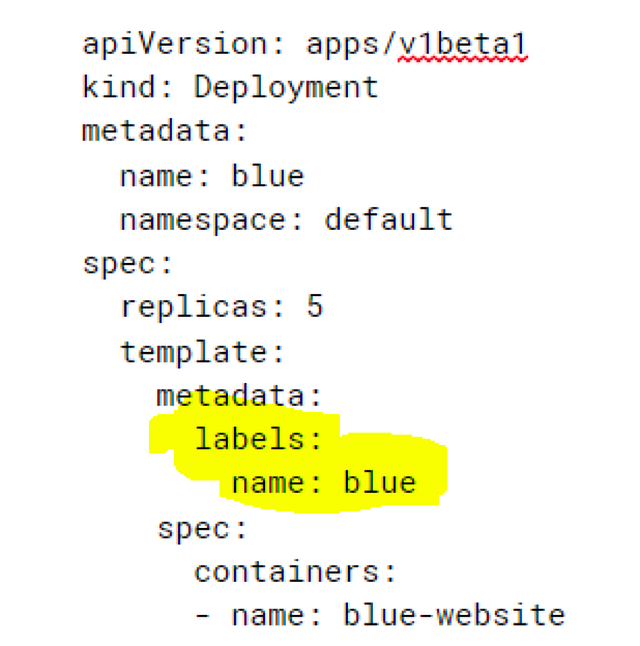
We chose to call the label “name”, but it could be anything (for example, “application” or “k8s-app”).
There are several service types, including ClusterIP, NodePort, and LoadBalancer. ClusterIP (which we just created) will have only internal IP and is not exposed on host ports. NodePort will bind to a host port and route traffic to correct containers by dynamically reconfiguring iptables rules every time a related pod gets created or removed. LoadBalancer will use underlying cloud provider APIs to create and configure cloud load balancers (like ELB on AWS).
Creating Host-Based Routing
We now have the pods and services, but one last condition must be met in our scenario: host-based routing. We will use “ingress” rules and “ingress controller” for routing.
The “ingress resource” is a set of rules mapping DNS name to service. A “controller” is any load balancing application that will read those rules and reconfigure itself on the fly to route traffic based on those rules. At the moment there are two supported open-source controllers: Nginx and HAproxy. These controllers can be used with any underlying infrastructure (OpenStack, bare-metal, etc). In addition, there are Google cloud and AWS controllers (AWS ALB controller provided by CoreOS team).
We will deploy the Nginx controller. This controller consists of Nginx pods with special dynamic configuration scripts inside, the service resource, and a simple “default-http-backend” that serves a 404 page in the event Nginx does not find the correct DNS mapping in its config.
We must start with the default backend to ensure the Nginx controllers will initialize and not throw a “no default backend” error. You can deploy the default from the official GitHub repository using this command:
kubectl create -f \
https://raw.githubusercontent.com/kubernetes/ingress-nginx/094e9ba6f9d311cec0fd775b347aa79f2fd8e9d5/examples/rbac/default-backend.yml
Next is the controller, service, and RBAC roles from the same repository. We must replace namespace in those files, so we’ll first download the files:
wget
https://raw.githubusercontent.com/kubernetes/ingress-nginx/094e9ba6f9d311cec0fd775b347aa79f2fd8e9d5/examples/rbac/nginx-ingress-controller-rbac.yml
wget
https://raw.githubusercontent.com/kubernetes/ingress-nginx/094e9ba6f9d311cec0fd775b347aa79f2fd8e9d5/examples/rbac/nginx-ingress-controller.yml
wget
https://raw.githubusercontent.com/kubernetes/ingress-nginx/094e9ba6f9d311cec0fd775b347aa79f2fd8e9d5/examples/rbac/nginx-ingress-controller-service.yml
Replace the “namespace: nginx-ingress” with “namespace: default” using sed in all three “yml” files at the same time:
sed -i 's/namespace: nginx-ingress/namespace: default/g' *.yml
Next, delete the first 5 lines from the nginx-ingress-controller-rbac.yml file. (These are the new namespace creation lines and are not relevant in our current setup, but they will throw a “namespace already exist” warning if not removed.)
Submit each file with kubectl create -f.
Note: if you submit the nginx-ingress-controller.yml file first and look at the running pods before you submit the other two files, you’ll see the Nginx pods in a failed state. This is because the “service account” (the credentials to call Kubernetes API that every pod must have if it needs to access API) doesn’t exist yet, and the RBAC roles do not yet exist.
To allow the Nginx pods to query Kubernetes master API (it needs to read ingress rules, existing services, and a few more resources), we must submit the nginx-ingress-controller-rbac.yml file.
The last nginx-ingress-controller-service.yml file has a simple service definition for the ingress controller pods themselves. This file has a “NodePort” type that exposes host port 30080 for incoming external traffic.
Next, check the dashboard to confirm everything was launched and the pods are healthy. You should see new pods:
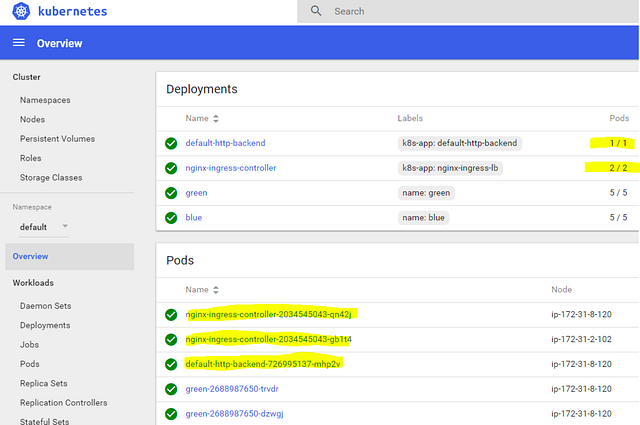
For production use, we can either deploy the Nginx pods on dedicated machines and allow them to consume all resources there (these will be our dedicated load balancing machines), or we can distribute the pods across all nodes in the cluster . In the latter case, it is better to convert the “deployment” type to “daemon set” so that each host will have exactly one pod running. If you distribute the Nginx pods across many nodes, you must either DNS load balance the incoming traffic (using CNAME records) or point your cloud load balancer at all nodes which have the Nginxs running, with all DNS names pointing to that same load balancer.
We are now ready for ingress traffic; however, the Nginx load balancers aren’t aware of any routing rules. We will map DNS names to our “green” and “blue” services. Create a file named “custom-ingress-rules.yml” which contains:
apiVersion: extensions/v1beta1
kind: Ingress
metadata:
  name: host-based-ingress
  namespace: default
spec:
  backend:
    serviceName: default-http-backend
    servicePort: 80
  rules:
  - host: blue.mywebsite.com
    http:
      paths:
      - path: /
        backend:
          serviceName: blue-website
          servicePort: 80
  - host: green.mywebsite.com
    http:
      paths:
      - path: /
        backend:
          serviceName: green-website
          servicePort: 80
This is the ingress resource, and we can always edit it later (using “kubectl edit ingress host-based-ingress” or through the web UI dashboard) to add or remove routing rules. The “host-based-ingress” is our custom name for this resource.
As you can see, we have mapped the “blue.mywebsite.com” to be routed to “blue-website” service and the “green.mywebsite.com” to “green-website”. The Nginx ingress controller pods now sync these rules to their configuration files. You can verify this by running web-based “shell” in the dashboard, connecting to one of the pods, and displaying the config file.
Using the dashboard “exec” feature, select “pods” on the sidebar. Select one of the “nginx-ingress-controllers“ to display the “pod details” page:
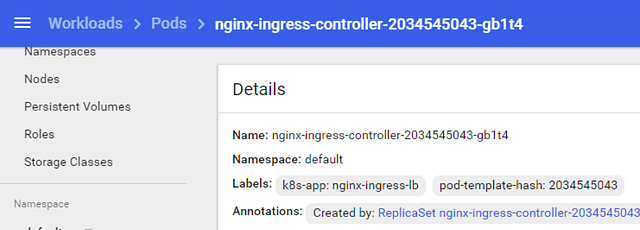
Next, click the “exec” button on the right:
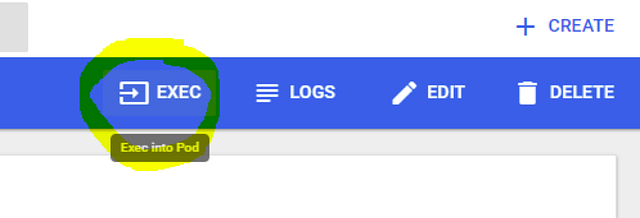
This will launch a live terminal session:
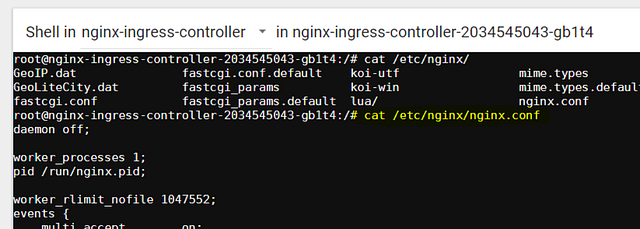
Run cat /etc/nginx/nginx.conf to see the config file. Within the file you will see:
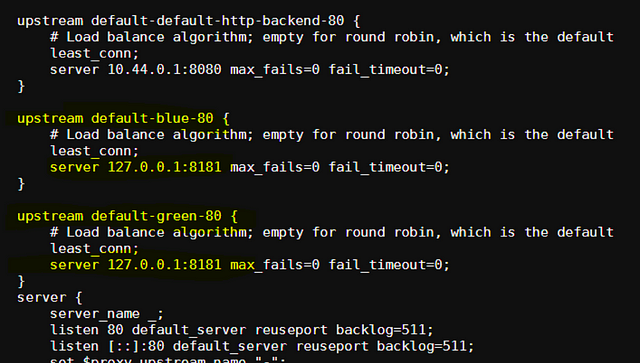
These are our custom routing rules in action, directly from the Kubernetes ingress resource.
Now we can finally test our highly available green and blue websites!
Testing the Highly Available Websites
We used a custom domain name (“mywebsite.com”) for this example and have not registered a real DNS name. We must add this domain name to “/etc/hosts” (if you’re on linux) or “C:\Windows\system32\drivers\etc\hosts”, and point the domain to one of our server’s external IP to ensure that when we hit the address the browser will reach our server. Depending on the subdomain URL we use, Kubernetes will route our request to corresponding service resource, which, in turn, gets us to the correct pod.
Note: In a production setup of this topology, you would place all “frontend” Kubernetes workers behind a pool of load balancers or behind one load balancer in a public cloud setup. (Usually, the cloud provider takes care of scaling out underlying load balancer nodes, while the user has only one visible “load balancer resource” to configure.) This ensures your DNS records point to those load balancers, and not directly to servers as in our example.
Next, we’ll browse to http://green.mywebsite.com:30080. The custom port is necessary because we want to hit the ingress controller, and the “NodePort” we chose was 30080. As previously described, in a production environment you would point the DNS to an external load balancer like ELB, which points to all Kubernetes nodes on this port but listens on HTTPS 443 itself, for public access traffic.
You will see the green website corresponding to the docker image we chose earlier for this deployment.

Navigating to “blue.mywebsite.com:30080” will display the blue website. This is a separate deployment running five container replicas (like the green one) so, in total, we have ten containers spread across two Kubernetes nodes.

If you turn off one of the nodes, you will see that all pods are automatically transferred to the second machine. Now the second machine holds all 10 of our containers provided it has the capacity, which, in our case, is just 2gb of memory for 10 replicas. If it doesn’t have 2gb memory, we’ll still see both sites available, because even one green and one blue container provide the availability, and we will have two to three of them, running successfully, even on a smaller machine.
