
Containers and Kubernetes can create code that is portable across on-premise VMs, bare metal, and multiple cloud provider environments. Despite this portability promise, developers may include configuration and application definitions that constrain or even eliminate application portability. During our recent online meetup, Application Portability with Kubernetes, Oleg Chunikhin, CTO at Kublr, described best practices for using “configuration as code” in a Kubernetes environment. Here you’ll find key takeaways and all the resources you need to get started: instructions and sample code, presentation slides, and a link to the webinar recording.
In this article/demo we will use two Kubernetes clusters, deployed in AWS and Azure correspondingly, to show how a correctly built application may be deployed into different environments with just configuration changes. It is made possible because Kubernetes provides convenient abstractions for application resource requirements and endpoints, namely persistent volumes and ingress rules and ingress controllers.
Another portability enabler is Helm templating, so we will look into the anatomy of the Helm package we are using to deploy the demo application. We will also show how open source cloud-native storage frameworks such as Rook/Ceph may help significantly simplify setting up environment-agnostic and highly portable data storage layer. We will deploy Rook Ceph operator, create a Ceph cluster running on a Kubernetes cluster, and use it to provide our demo application with persistent storage.
Why Build Portable Apps?
Portability is one of the core advantages of containers technology. While some companies may be happy with the environment they are working in, other companies may profit from applications that can move between different environments. Here are just some of them:
- Fast response to traffic from any geographical location by allowing you to spawn containers immediately in another region.
- Easily migrate applications from one cloud or hosting provider to another, in order to save costs or add an additional point of presence for your applications, using additional regions not available in other cloud providers.
- Ability to cloud-burst workloads that are generally on-premises, but may need cloud capacity at some point.
- Split-tier architecture (application tiers may reside in different environments).
- Disaster recovery strategy may require recovery in a different region or cloud, or you may host your application on a data center and recover into a cloud.
Not only does the environment have to be portability compatible, the application has to be correctly designed too. Your bible for portable apps best practices is the 12-factor app methodology manifest. Particularly, ‘verses’ 2, 3, 4, 6, 7, and 12.
- Explicitly declare and isolate dependencies. The application should not assume an existing package or component already available by default in the environment.
- Store configuration in the environment, avoid keeping configuration in application code. When migrating to another cloud or region, the configuration can change, but the application should not need changes.
- Treat backing services as attached resources. The application should be able to reinitialize detached and reattached resource (such as Redis cache or MySql database).
- Execute the application as one or more stateless Do not store any data in the application container or environment, all persistent data has to be stored in a database or other type of storage (ElasticSearch, Cassandra, dedicated file storage, etc’).
Typical problems that arise when building portable applications
Some of the hardest and most common problems when moving applications across environments are handling Ingress traffic (specifically HTTPS/SSL certificates management), routing and load balancing. Complex routing rules are sometimes required and need to be managed by cluster administrators. State persistence can also be a challenge, while some apps require databases, others may need shared file storage or reliable block storage. Messaging is another area, though we won’t focus on this in this blog post.
Not all environments satisfy the needed requirements. Cloud providers may supply only part of the required services that your applications need (like supporting only a particular type of database, so you have no choice but to deploy your own database manually and maintain it on that cloud provider. Think of Cassandra. You can’t easily find it available in an as-a-service in most public clouds).
Platforms have different degrees of capabilities. A “rich” platform satisfies all application needs and dependencies:
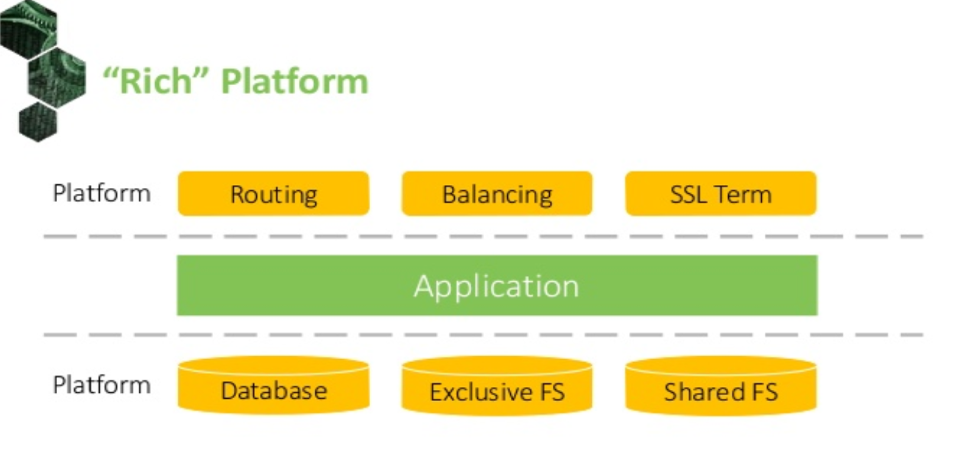
It has flexible routing capabilities, load balancing with SSL termination, databases, and both types of block storage we need.
Then, there are some with fewer capabilities.
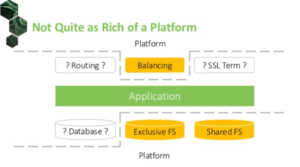
These platforms can satisfy only part of deployed application needs. To get the missing components you may manually deploy custom open source solutions, like proxies and databases hosted on dedicated instances. But that is error prone and quite frankly a nightmare to manage.
Other hosting providers might supply even fewer services on their platforms. Yet, you still need to be able to deploy your applications on them. That leaves you with no choice but to use the limited functionality of the hosting provider or datacenter.
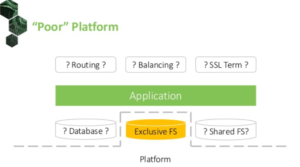
This is where you can benefit from Kubernetes. You can wrap it around the basic provided resources of the hosting provider, and spawn fail-tolerant services on top of the raw resources, using Helm package manager for example. This way, your application can leverage Kubernetes services, instead of relying on the hosting provider. As you can move all its dependencies with the application, it becomes portable.
Kubernetes is great because it functions almost like a Lego set where you can connect your component and external services anywhere you like. Here are some features of Kubernetes and its ecosystem that help make your applications, its dependencies, and backing services portable:
- Component definitions and their connectivity and relation to each other, including routing and access policies, are stored as all other resources in simple YAML format.
- Templating tools: Helm package manager. You can define and reuse templates (or “blueprints”) made of several services with variable settings. Each template can contain as many resources as needed, like pods, volumes, load balancers, security settings, deployments and other Kubernetes resources.
- Abstraction over ingress traffic processing: Service, Ingress, and Ingress controller. Those components serve as a robust framework that satisfies all routing and balancing needs of your application and its backing services.
- Abstraction over storage provisioning and management: Volumes and Volume claims. These all were made possible by sophisticated “behind the scenes” controllers and plugins, that integrate with all virtualization, storage, and cloud providers, and expose a unified syntax for provisioning storage to cluster users.
Basic Kubernetes Concepts
There are a variety of Kubernetes components that make application portability possible
- Services: one of the basic k8s concepts that allow you to provide a single, stable endpoint to access a set of pods or containers running inside a Kubernetes cluster. This pod/container set is dynamic, can be started, scaled up or down, die, or restarted. Services track these dynamic sets and rearrange routing rules so that clients of this service implemented don’t see the change.
- Ingress: is an abstraction of a higher level than ‘service’ with a similar purpose. It’s a level 7 routing rule, which tells k8s how HTTP and HTTPS requests should be routed to services inside the cluster.
- Ingress controllers: Implements routing rules for the ingress. Layer 7 reverse proxy that runs inside Kubernetes watches those ingress rules as they are updated by cluster users and reconfigures itself to ensure proper processing of HTTP and HTTP requests. There are various implementations; some are based on Nginx or HAproxy as an example.
- Config maps and secrets: allows storing configuration or sensitive information like credentials, inside the Kubernetes cluster and mapping them to pods and containers. This allows for complete portability of all application components including their per-namespace and per-environment credentials and settings.
- Volumes and volume claims: This type of complete abstraction over storage mechanics, contributes to portability by letting developers and administrators avoid manually configuring low-level storage-related settings and managing folder mounts.
To summarize, a portable application architecture involves not only the usage of the right tools, but also correct planning and best practices, like keeping the app stateless, supporting re-initialization and reconnection to external resources like databases, and so on.
To try Kubernetes, download Kublr-in-a-Box for seamless creation and management of local development or production clusters!
Roll up your sleeves. It’s time to deploy portable applications!
Step-by-Step Guide
Environment Preparation
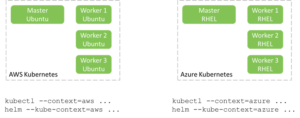
Our demo environment, based on Kublr and using Kublr command-line tools, includes two Kublr-managed Kubernetes clusters: one in AWS and another in Azure.
Generally speaking, any other tool may be used to set up these Kubernetes clusters (although other tools were not tested). If you use tools other than Kublr to setup the clusters, the clusters must satisfy the requirements summarized in Setting Up Non-Kublr-Created Clusters.

Watch our Online Meetup on Application Portability with Kubernetes
Setting Up Clusters with Kublr
Before you get started install Kublr-in-a-Box using the instructions provided.
Set up two clusters, one in AWS and one in Azure, using the following guidelines:
-
Find more information on how to set up clusters in Kublr using the Kublr Quick Start Guide.
-
Each cluster includes 1 master and 3 worker nodes:
- AWS: t2.medium instance type for both: masters and work nodes
- Azure: Standard_D3_v2 instance type for both: masters and work nodes.
-
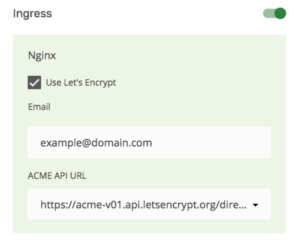
Turn on Ingress and configure Let’s Encrypt for both clusters:
Wait until the clusters are in Running state.
Download the Kubernetes config files for your clusters and merge them into one Kubernetes config file by copying the content of the following sections: clusters, users, and contexts. Rename the contexts to aws and azure respectively. This may require a bit of homework to understand the Kubernetes client config file structure – we will leave it to the reader to take a look at Kubernetes’ documentation and for more information. Install config file, kubectl, and Helm as described in the Kublr Quick Start Guide referenced above.
Test kubectl and helm commands:
kubectl --context=aws get nodes
kubectl --context=azure get nodes
helm --kube-context=aws list
helm --kube-context=azure list
Setup the domains for these two clusters by pointing them to the Load Balancers of the newly created clusters. More details can be found here: How to Configure DNS for a Cluster with Ingress Controller.
This document assumes that the *.port-aws.demo.kublr.com and *.port-azure.demo.kublr.com DNS records are configured for the AWS and Azure cluster ingress controllers, respectively.
Should different domain names be selected, corresponding changes must be made in all values-*-host*.yaml files.
Setting Up Non-Kublr-Created Clusters
You do not have to use Kublr to set up the test clusters, any other tool may be used to set them up as long as the clusters created are more or less compatible with standard Kubernetes. Set up two clusters, one in AWS and one in Azure, and make sure that they satisfy the following requirements:
- Each cluster includes 3 worker nodes.
- Helm/Tiller is deployed into each cluster
- The AWS Kubernetes cluster has the AWS cloud controller enabled, and the cloud controller can operate EBS disks. A StorageClass object default exists and is set up to dynamically provision AWS EBS backed persistent volumes.
- The Azure Kubernetes cluster has the Azure cloud controller enabled, and the cloud controller can operate Azure disks. A StorageClass object default exists and is set up to dynamically provision Azure disk backed persistent volumes.
- For Rook/Ceph related scenarios, Ceph and RBD file systems are properly supported on the worker nodes (client packages and/or libraries are installed).
- An ingress controller is deployed into each cluster. The ingress controllers should support SSL termination and integration with the Letsencrypt service (for example https://github.com/jetstack/kube-lego or https://github.com/jetstack/cert-manager/ ) in order for all demo scenarios to work correctly.
- Wildcard DNS records are configured for the ingress controllers:
*.port-aws.demo.kublr.comand*.port-azure.demo.kublr.comfor AWS and Azure, respectively. If you reproduce the scenarios in your own environment, you will most probably use different domain names, in which case some changes need to be made in the demo scenario and some of the following value files:values-*-host*.yaml.
Refer to the Variations section for more details.
Variations
When setting up a specific environment, some of the parameters may or will vary:
- Kublr’s private repository access credentials (see Configure Access Credentials for more details).
- Ingress controllers’ endpoints will be different for different clusters.
- Different domain names may be used.
This document assumes that the *.port-aws.demo.kublr.com and *.port-azure.demo.kublr.com DNS records are configured for the AWS and Azure cluster ingress controllers, respectively.
Should different domain names be selected, corresponding changes must be made in all values-*-host*.yaml files.
Demo Application
Now, that we have both demo clusters and the client environment set up, let’s talk about our demo application.
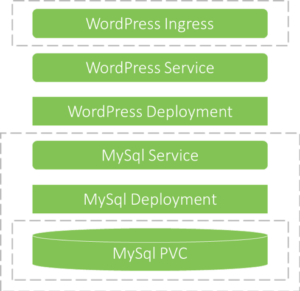
The demo application is packaged as a Helm package including a WordPress deployment that can be configured to work either with an external MySql database or, optionally, with a self-hosted MySql database running in the same Kubernetes cluster.
A self-hosted MySql database deployment is also a part of the same helm package, but it is optionally created depending on the package deployment configuration. If the MySql database is created, the package configuration will further define the type of persistent volumes used by the database.
You may find the helm package in the demo-wordpress directory; here is a more detailed explanation of the package structure:
- The
demo-wordpress/templatesdirectory contains templates Helm uses to generate Kubernetes definitions. demo-wordpress/templates/wordpress-deployment.yamlanddemo-wordpress/templates/wordpress-service.yamlare responsible for WordPress application deployment and service correspondingly. The service template is quite simple, but it makes sense to take a close look at the deployment object template. You may find several elements in there that are parameterized.
First of all, you will notice a number of metadata elements – such as labels and object names – parameterized with the package installation identifiers.
Digging further you may find some provisions for the package to support different versions of Kubernetes (note how deployment’sapiVersionproperty is parameterized).
At last, note how database connection properties depend on the package deployment parameters – parameters available in the templates via.Valuesdemo-wordpress/templates/wordpress-ingress.yamlis responsible for WordPress Ingress rule object.
As you may find from the template, it allows for quite a few configuration options.
First of all, Ingress object creation is optional – it may or may not be created depending on the package deployment parameters.
Further, if the Ingress rule is created, it may or may not provide HTTPS termination and/or hostname routing depending on the package deployment parameters.demo-wordpress/templates/mysql-deployment.yamlanddemo-wordpress/templates/mysql-service.yamlare responsible for self-hosted MySql deployment and service correspondingly.
The first thing to note here is that these objects are conditional on package deployment parameters – if external MySql connection properties are provided, self-hosted MySql is not deployed.
The second important item in the self-hosted MySql deployment template is a quite extensive conditional definition of persistent volumes used by MySql to store data.
As you can see, the one who deploys of the package may decide not to have persistence at all, in which case KubernetesemptyDirvolume type will be used. Volumes ofemptyDirtype only store data as long as the pod using them is alive. If the pod is restarted, it is started with fresh new empty volume. This may be convenient for testing or evaluation purposes.
If persistence is needed, the user may settle with a HostPath volume type, which ensures that data survive pod restarts, but only within a specified node.
The next alternative is preconfigured user-provided persistent volume claim. If a name of such a claim is specified in package deployment parameters, Kubernetes will try to use it to provide MySql pods with persistent storage. This is the option that provides the most flexibility but also requires some administrative preparatory work – the deployer of the programming must make sure that a KubernetesPersistentVolumeandPersistentVolumeClaimobjects exist and are bound before deploying the package.
And the last option for persistence is Kubernetes dynamically allocated persistent volumes.- The last template
demo-wordpress/templates/mysql-pvc.yamlis responsible for MySql persistent volume claim in case dynamic volume allocation is selected for MySql persistence. It is parameterized with storage class name and required volume size.
Ingress
Now, that we familiarized ourselves with the structure of demo application package, let’s roll our sleeves and get deployin’.
1. Deploy the package for evaluation on AWS
First, we will deploy the package in a very minimal self-hosted no-persistence configuration, best suitable for testing or evaluating an application. In this setup, you don’t need to worry/think about where to store the data, or what DNS name to assign to the application, or how to clean up the application data after the evaluation is finished.
Run the following command from the command line:
helm --kube-context=aws upgrade -i demo demo-wordpress -f values-evaluation.yaml
Wait until all pods are deployed, running, and healthy (approximately 1 to 2 minutes); you may check pods status in the Kubernetes dashboard.
What happens here:
- We run the Helm command line CLI tool against the Kubernetes cluster in AWS.
- We are running the
upgradesubcommand with-iflag, package installation namedemoand the package from./demo-wordpress.
This means that helm/tiller will try to find an existing installation named demo and upgrade it, or install it if it does not exist yet. -f values-evaluation.yamloption means that the package installation parameters must be taken from thevalues-evaluation.yaml.Only values that differ from defaults specified in the package need to be provided in the file.
A quick look at the values-evaluation.yaml file shows that the file is empty, which means that for this setup we do not override any default parameter values and that generally speaking, we did not have to specify the parameter file at all.
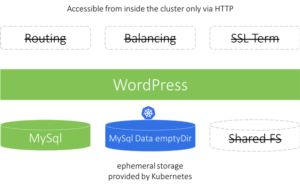
In any case, deploying the package with all default values results in a bare minimum deployment of WordPress and self-hosted MySql:
- No ingress rule is created for WordPress deployment, only service. Therefore WordPress is only accessible from inside the cluster, or via Kubernetes port-forwarding.
- No persistent volumes or volume claims are created, instead, a transient
emptyDirvolume is configured for MySql pod.
Confirm that WordPress is deployed (WordPress and MySql pods in the k8s dashboard are green and are not restarting for a minute or two) and start the port forwarding:
kubectl --context aws port-forward \
    $(kubectl --context aws get pods -l app=demo-demo-wordpress-wordpress -o custom-columns=name:metadata.name --no-headers=true) \
    8080:80
Open http://localhost:8080/ and you should be able to see the WordPress initialization welcome screen.
2. Deploy with Ingress and HTTP
Next step is to enable external traffic to the application via Ingress rule.
Run command as follows:
helm --kube-context=aws upgrade -i demo demo-wordpress -f values-evaluation-ingress.yaml
Here we are upgrading the same package deployment instance using the same Helm package but apply a different parameter file. Checking this parameter file shows that the only difference is that we enabled Ingress.
After the package is upgraded, you should be able to open http://
3. Deploy with Ingress and HTTPS
Next step is enabling SSL termination on the ingress controller.
helm --kube-context=aws upgrade -i demo demo-wordpress -f values-evaluation-ingress-ssl.yaml
Open the same HTTP address of the cluster ingress load balancer http://
4. Deploy with Ingress, HTTPS, and host routing.
Next step is to fully enable the WordPress UI with a real hostname and a valid HTTPS certificate.
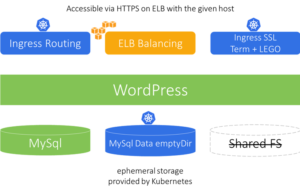
helm --kube-context=aws upgrade -i demo demo-wordpress -f values-evaluation-ingress-ssl-host-aws.yaml
Examining the parameters file shows that in addition to the previous setup, we also specified a hostname for the Ingress rule.
Again make sure that all pods are deployed and healthy.
Open http://wp.port-aws.demo.kublr.com/ to test; it should be redirected to https://wp.port-aws.demo.kublr.com/ with a valid HTTPS certificate.
The same deployments may be repeated on Azure. Change the context name from aws to azure, and the *-aws.yaml configuration files to corresponding …-azure.yaml files in the commands above. For example, you can deploy an evaluation version with ingress on Azure as follows:
helm --kube-context=azure upgrade -i demo demo-wordpress -f values-evaluation-ingress-ssl-host-azure.yaml
Managed Persistence
All deployments we did so far did not take persistence into account, MySql was deployed with transient volumes of emptyDir type. This means that none of the deployments above would survive MySql pod failure. If the MySql pod dies, all WordPress data and configuration would be lost even though Kubernetes will restart it.
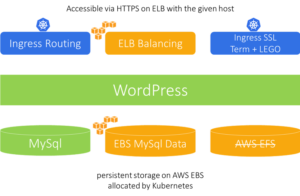
To upgrade our demo deployment on AWS Kubernetes cluster so that data is persisted on AWS EBS volumes, run the following command:
helm --kube-context=aws upgrade -i demo demo-wordpress -f values-persistent-ingress-ssl-host-aws.yaml
Looking at the values file used here we will see that in addition to all previously specified parameters, we enabled MySql persistence. The package is built in such a manner that if persistence is enabled, the default package behavior is to create a PersistentVolumeClaim with storage class default; and because our clusters are configured with default storage class configured for dynamic volume allocation of cloud-specific block device volumes (EBS in case of Amazon), this is exactly what will happen – Kubernetes will dynamically allocate a new EBS volume for MySql Pod data.
You will notice that after this WordPress stops working – the web UI will start showing 500 HTTP error. This happens because MySql will have been restarted with new storage and the WordPress-initialized database stored on a transient emptyDir volume will have been lost because of that.
To fix it, you just need to restart the WordPress pod so that WordPress can re-initialize its database on the new storage.
kubectl --context aws delete pods -l app=demo-demo-wordpress-wordpress --now
After the application is initialized and started, it will be able to survive both, a WordPress and MySql pod restart. You can try how application and DB recovery work by killing pods with the following commands:
# Kill WordPress pod
kubectl --context aws delete pods -l app=demo-demo-wordpress-wordpress --now

# Kill MySql pod
kubectl --context aws delete pods -l app=demo-demo-wordpress-mysql --now
Self-Hosted Persistence
On the previous steps, we saw how easily a cloud-native Kubernetes application may be set up to use cloud provider managed data storage.
But what can we do in the situation where managed data storage is not available, or does not fit our requirements for any reason?
Kubernetes may help with this as well by significantly simplifying deployment and operating self-hosted cloud-native storage tools. In this section, we will see how the open source cloud-native framework Rook and distributed clustered storage system Ceph can be used to compensate for missing managed data storage.
We will repeat deployment of the same demo application with MySql backed by a Rook/Ceph data storage cluster, but first things first – we need to make sure that a Ceph cluster is deployed and replica pool named (unimaginatively) replicapool exists in that cluster. This is the focus of the next section.
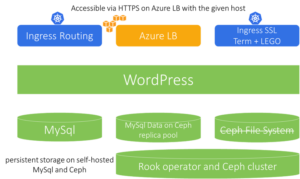
Deploy Rook Operator, Ceph Cluster, and a replica pool
First of all, due to how Rook currently assigns Ceph components to Kubernetes nodes, and due to an inconsistency in Kubernetes AWS nodes naming and labeling, we need to make sure that the node labels are correct:
for n in $(kubectl --context=azure get nodes -o=custom-columns=NAME:.metadata.name --no-headers); do
    echo -n "$n: "; kubectl --context=azure label --overwrite node "$n" "kubernetes.io/hostname=$n"
done
As you can see here, the script above just makes sure that for all cluster nodes value of the label kubernetes.io/hostname is the same as the node name.
Now let’s deploy Rook Ceph operator:
kubectl --context=azure apply -f rook/rook-operator.yaml
It is not an instantaneous operation, the operator takes some time to initialize required components, and so you need to wait until the operator is completely started and available. For that check the operator’s pods using the following command until you see that 1 agent pod for each node in the cluster and 1 operator pod are in Running state:
# Check that the operator is deployed (1 operator, 1 agent per node should be available)
kubectl --context=azure get -n rook-system pods
Check and wait until you see that all the required pods are running and healthy.
Next, we need to deploy a Ceph cluster and tools:
# cluster
kubectl --context=azure apply -f rook/rook-cluster.yaml
Make sure that all cluster components are running – you should be able to see 1 API pod, 1 manager pod, 3 monitor pods, and 1 osd pod for each node of the cluster (3 in our case):
# check the Rook cluster is deployed (1 api, 1 mgr, 3 mon, 1 osd per node)
kubectl --context=azure get -n rook pods
Check and wait until you see that all the required pods are running and healthy.
After the cluster is started you can deploy a pod with Rook tools and check Rook cluster status with them:
# deploy tools
kubectl --context=azure apply -f rook/rook-tools.yaml

# test cluster and tools
kubectl --context=azure exec -n rook rook-tools -- rookctl status
You will see a detailed output describing Rook/Ceph cluster status, which is expected to be all OK.
Now prepare the Ceph replica pool and corresponding storage class for dynamic volume allocation:
kubectl --context=azure apply -f rook/rook-storageclass.yaml

# check pools (replicapool)
kubectl --context=azure exec -n rook rook-tools -- ceph osd pool ls detail
Now we are ready to deploy the demo application.
Deploy demo application On Azure With Self-Hosted Persistence
As long as the Rook operator is deployed, and Ceph cluster, replica pool, and storage class are created, the demo application with Ceph persistence can be deployed:
helm --kube-context=azure upgrade -i demo demo-wordpress -f values-persistent-ingress-ssl-host-azure.yaml
This command is exactly the same as the commands we used above to deploy or update the demo application previously, but with a different parameter values file.
Looking at the file reveals that here we additionally defined the storageClass parameter in the persistence section.
As a result, the helm package creates a new PersistentVolumeClaim object with the specified storage class rook-block.
The storage class rook-block in turn was created and configured to be used by Rook dynamic volume allocator to dynamically allocate volumes in Ceph storage pool we had set up in the previous section.
That’s it! You’ve seen how a properly constructed containerized app can be deployed to both Amazon and Azure using the Kublr platform, and how Kubernetes objects, such as persistent volumes, Ingress rules, and services, can be used to abstract from the infrastructure. For more resources, review the:
- Application Portability with Kubernetes Presentation Slides
- Application Portability with Kubernetes Recorded Webinar
- GitHub Repository https://github.com/kublr/demo-portability/