What’s a Canary Release and When do You Need it?
Deploying a new feature or application version can be daunting. Even with today’s advanced testing tools, something can still go wrong once deployed in production. Rolling it out to all users is risky and could have serious business implications. Canary release is a technique that allows you to roll out new features gradually until you’re sure it’s safe to push out to 100% of your user base. Modern cloud-native technology such as Kubernetes, Spinnaker, Istio, and Prometheus, enable this approach significantly reducing the risk of deployments.
As with anything in the DevOps space, you want to automate processes. To automate canary releases within a CI/CD pipeline process, you need to deploy the new version on a small subset of worker nodes and route only a small percentage of live production traffic to that release. You will also likely want to separate the traffic (which flows to the canary release version) not only by a certain user percentage but by specific criteria such as user geolocation, device type or browser, specific app version, free or premium users, and so on. During the gradual canary release process, we need to be able to increase or decrease the percentage of live traffic that flows into the new version until we are satisfied with the results, before switching completely to the new version. At the moment of writing, Kubernetes doesn’t provide the ability to separate based on specific criteria, but it is achievable with additional tools that integrate with or extend Kubernetes’ functionality.
In this article, we will introduce two powerful tools that can help you to achieve an effective and safe canary release workflow. These are Spinnaker continuous delivery platform and Istio service mesh.
Canary Release Using Native Vanilla Kubernetes Resources
Let’s first look at what Kubernetes’ native capabilities are. Kubernetes has native deployment and service resources namely container replicas controller and an internal load balancer. The “service” is a fairly simple mechanism that only supports round-robin load balancing mechanism—a random selection of target pod to send traffic to.
This “poor man’s canary release” which can be achieved using only Kubernetes’ native resources works like this: Let’s say we have a production workload called “Deployment A”, and an existing load balancer resource that routes traffic called “Service A”. The service has its “pod selector” set on a label called “my-app”, so all pods of “Deployment A” should have this label, in order to be included in the traffic distribution of “Service A”. Now we release a new version of the application “my-app” and want to send only ten percent of the traffic to that new version. To achieve that, we create a “Deployment B” which has exactly 1/10 of the “Deployment A” pods and provides its deployment B pods with the same label (my-app) targeted by the service selector. This way, when “Service A” selects its random list of pods to send traffic to, it will send 1/10th of all selected pods with a new version from “Deployment B”, and 9/10 of all pods will still have the old version (“Deployment A”).
To gradually shift the amount of traffic to the new version, you will need to manipulate the replica counts of both deployments manually (or scripted, but we still consider this manually, as we’re going to talk to the Kubernetes API and cause it to update the deployment settings). In short, the only way to achieve a canary release with vanilla Kubernetes resources is by manipulating a number of pods in current and canary deployments manually or scripted-manually.
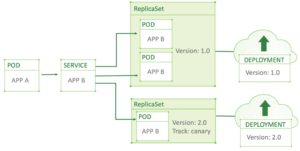
A manual approach isn’t scalable nor convenient, it does not allow us to select specific users to route to the new version (there is no information about the user browser, type, device, location, on the “Service A” level, it sees all traffic as a single pool of identical connections) and has no advanced features like latency aware load balancing, connection failover, identity-based service-to-service authentication and authorization within the cluster, tracing and detailed connection metrics, and many more features that a modern service mesh framework can provide.
Introducing Istio Service Mesh
In order to gain the additional flexibility in requests routing and management of traffic flow between our services and application components, we can install Istio into the Kubernetes clusters, and configure the Envoy sidecars to join all or most of our pods in the cluster, as described in our previous Istio hands-on tutorials. Below is a diagram that briefly illustrates Istio’s architecture in the cluster. There is much more going on behind the scenes, so consider this a bird’s-eye view of the Istio topology in Kubernetes cluster.
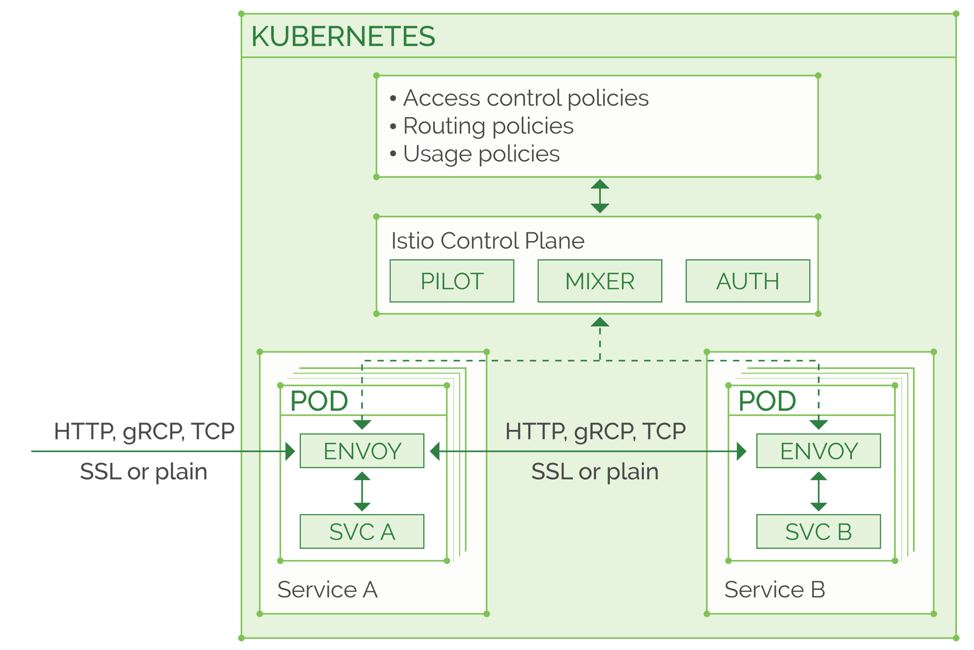
Adding Istio service mesh into a Kubernetes cluster expands the traffic routing capabilities and lifts the burden of retry and timeout logic and many more network related functionalities from your application components. Your time is much better spent developing new features than dealing with networking and connection related logic to mitigate possible issues clusters or external components like databases and caching servers may experience, especially if they easy to automate.
Istio’s “control plane” consists of Pilot, Mixer, and Auth services, and a “data plane” component, which is a high-performance Envoy proxy. The “data plane” services are used to configure every aspect of the routing logic and access policies in the service mesh, they basically are all used to combine their rules into a configuration for the data plane Envoy proxy, so all the access policies and routing rules end up as a plain Envoy container configuration that lives in your pods, and is updated and managed in real-time by the “control plane” components. The Envoy proxy needs to be installed into all your application pods that participate in the service mesh, and it will take care of the connection logic, you can configure retries and timeouts, circuit breakers, failure injection, access control policies, authentication and encryption, and the Envoy will apply all these policies and rules in real-time. All incoming and outgoing traffic between the pods and all traffic to and from external resources can be handled by the Envoy and will obey the specified rules.
The difference between canary deployment implementation with Istio-enabled cluster and vanilla Kubernetes is that you have plenty of routing logic capabilities when done through Istio. The most basic canary deployment with Istio “Virtual Service” resource is described below. The number and ratio of pods in the “new” canary version and the “old” running version does not matter, as long as each of them has enough capacity to handle the traffic we sent there. You can start with as little as one percent of the live traffic sent to the canary, using the following settings:
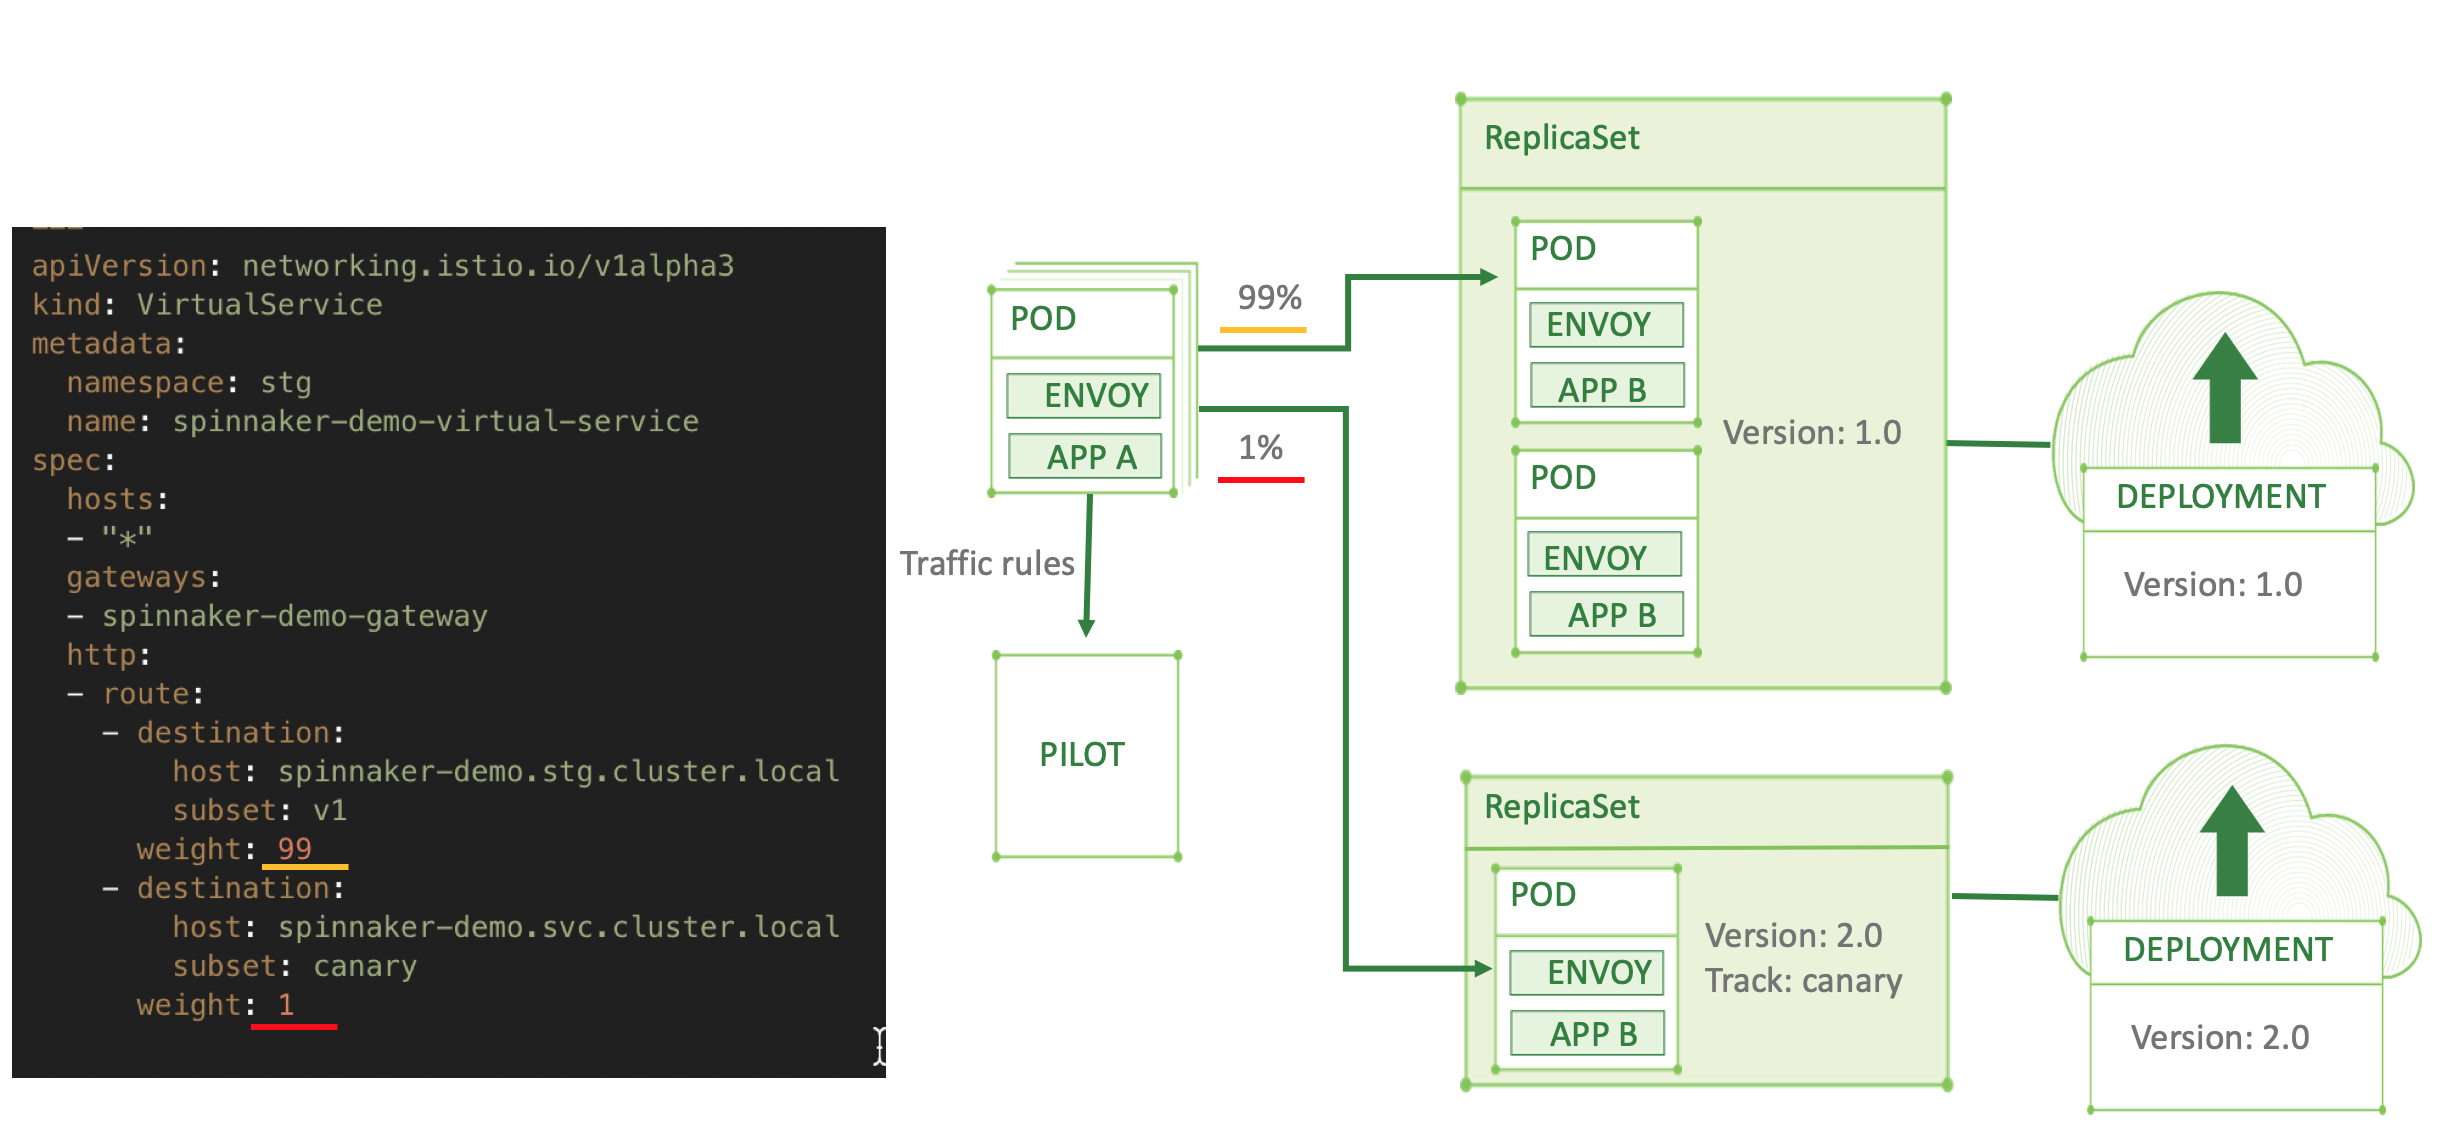
A “VirtualService” defines the routing rules in a service mesh, this is a brief introductory example, but if you’re interested in an in-depth read about all its capabilities, you can find it in the official documentation of the VirtualService Istio resource. In our diagram, you can see that we keep 99% of the traffic in the “v1” deployment (some kind of “existing live deployment”, it can be your current production) and start routing only 1% to the new “canary” subset. A “Subset” is any custom name you assign to a particular Kubernetes service label. The subset can also be an external service if there’s a need to do that, which can be declared using a ServiceEntry resource. Then, you can fine-tune the needed traffic routing ratio between the subsets at any time, and your changes will be applied immediately to the Envoy configurations inside the relevant pods, by the Pilot component which is responsible for managing and distributing these configurations. Below we illustrate splitting the same deployments traffic to 50% for the canary:
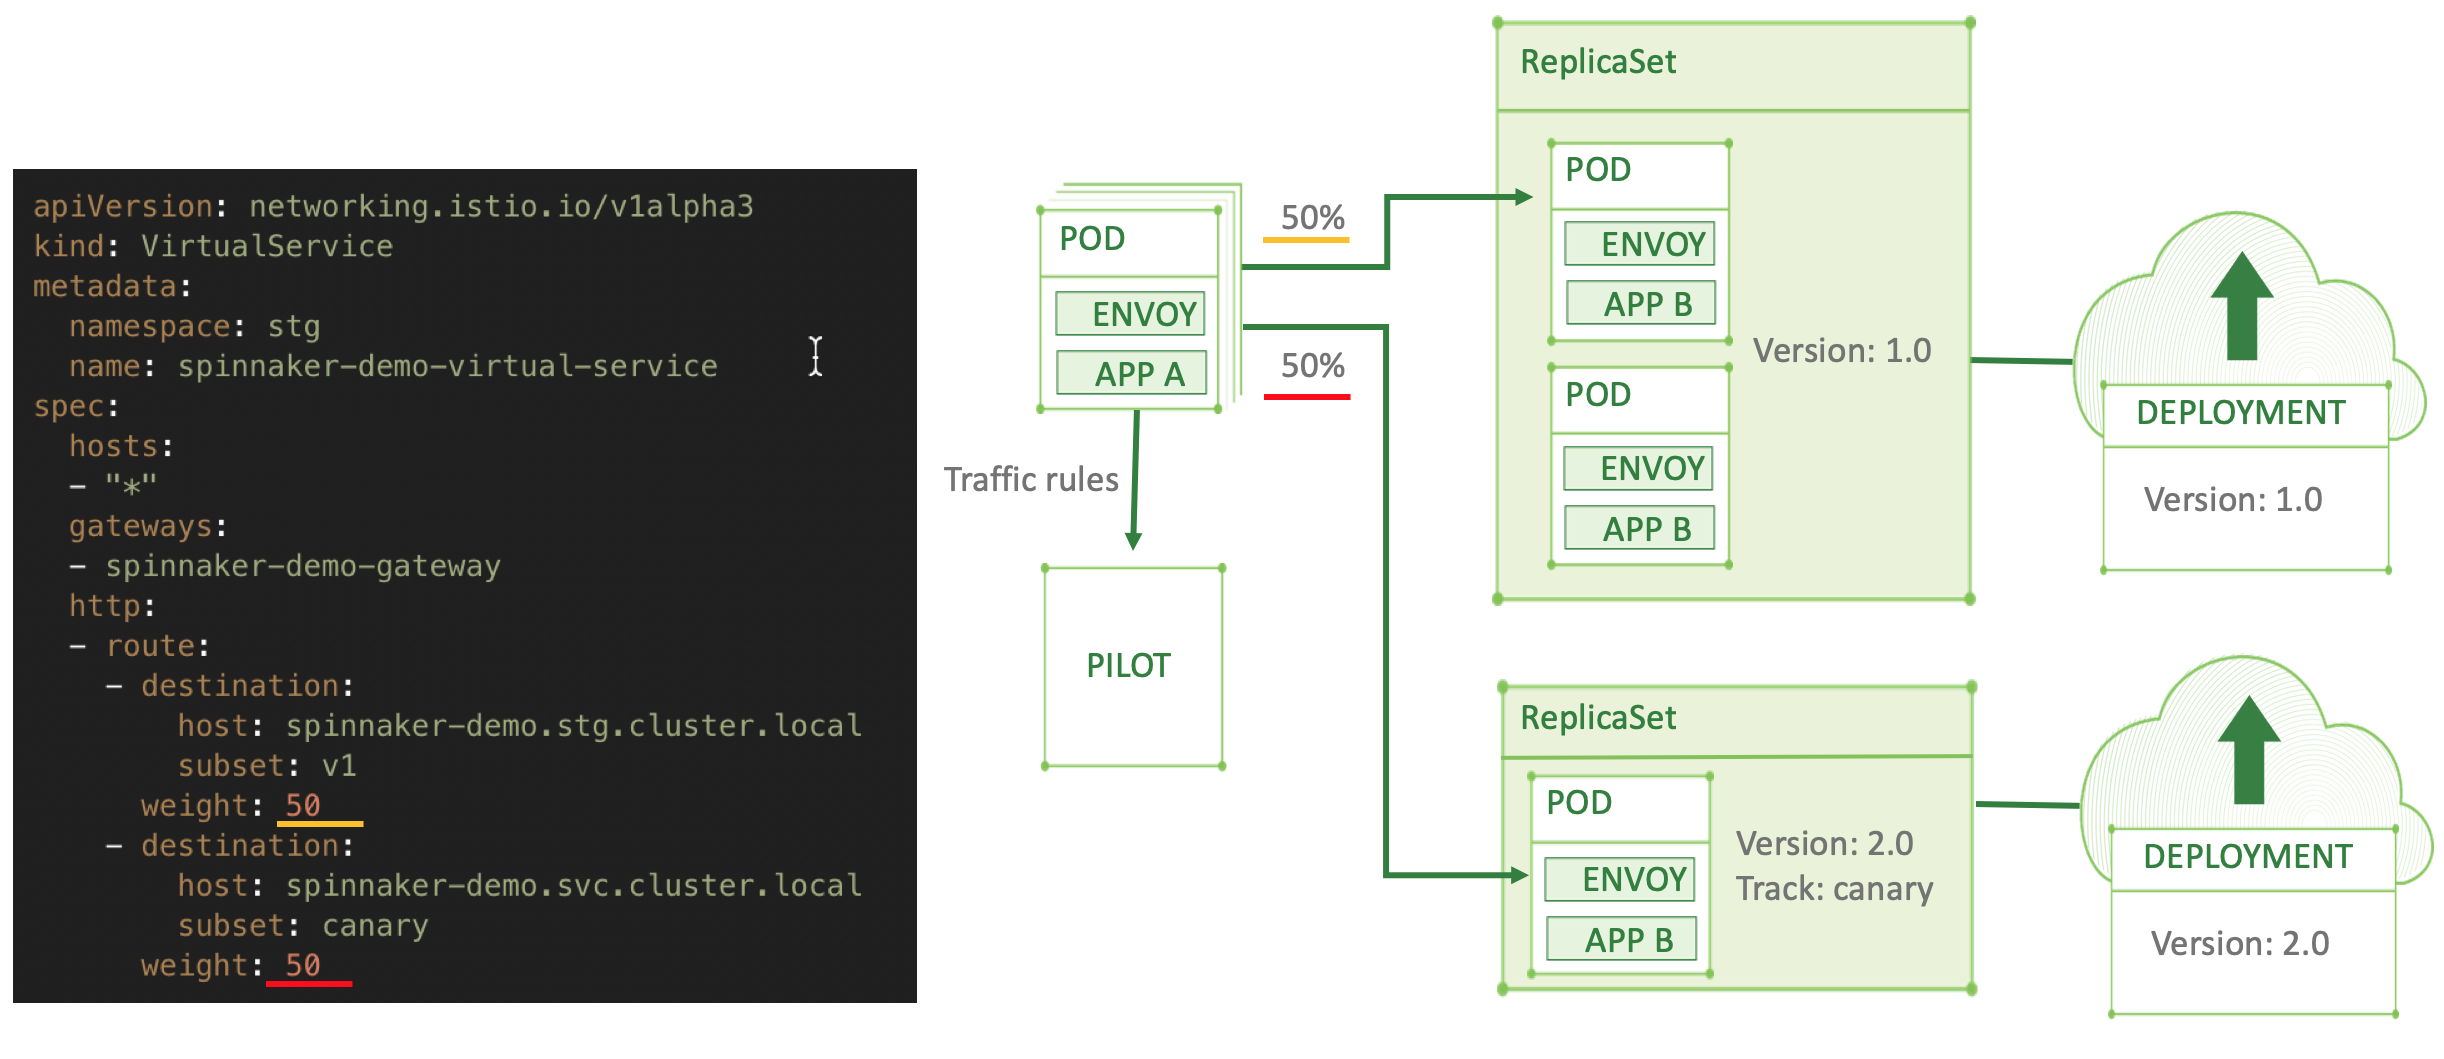 When the weight is set to the same number across two destinations in a route, the traffic will be split evenly. Then if you decide that the canary succeeded and passed all tests, it’s so easy to switch all 100% of the traffic to the new version by simply removing the old destination from the “VirtualService” definition as shown below:

As mentioned earlier, there are many ways to distinguish traffic and you do not have to split just by percentage (weight) between the releases. There are conditional rules in addition to simple weight based. Below are a few of the most useful types of conditions to use when routing requests to a canary release:
- URI prefix based (like /login or /buy or /api/v3)
- HTTP headers (route only those with specific header values)
- Restrict to source labels (which means when a request was received from a pod with a particular label), will apply only on requests that you select by Kubernetes labels. For example “send to canary statistics service only those requests that arrived from v0.12.17 imaginary purchases service” (this way you test the canary release only for specific subset of requests and users, and can combine several service releases at the same time for testing alongside the main production).
You can also combine these conditions into a multiple ‘match’ rules.
Spinnaker for Continuous Deployment
When you implement a service mesh and start using the shiny new routing and access policies features, you’ll need an advanced rapid deployment tool to deploy more frequently and leverage quick automation to submit a release for testing and deployment to a staging cluster, a canary, or launch A/B testing on a specific subset of production requests. With the vast amount of options Istio offers in your clusters, developers will want to leverage them to benefit all new features. However, the deployment tooling (probably Jenkins, or other CI previously used at a smaller scale and slower pace in your organization) isn’t flexible enough, and the DevOps team may feel that it could be done better when they look back at their Python/Bash/JS/Ruby scripts and existing self-written automation hacks (sometimes even involving quick and dirty methods of wrapping a kubectl / istioctl / docker CLI commands in a custom script, instead of working directly with Kubernetes/Istio/Docker APIs through their language of choice SDKs and packages). Below is an example of Spinnaker user interface with two active clusters.
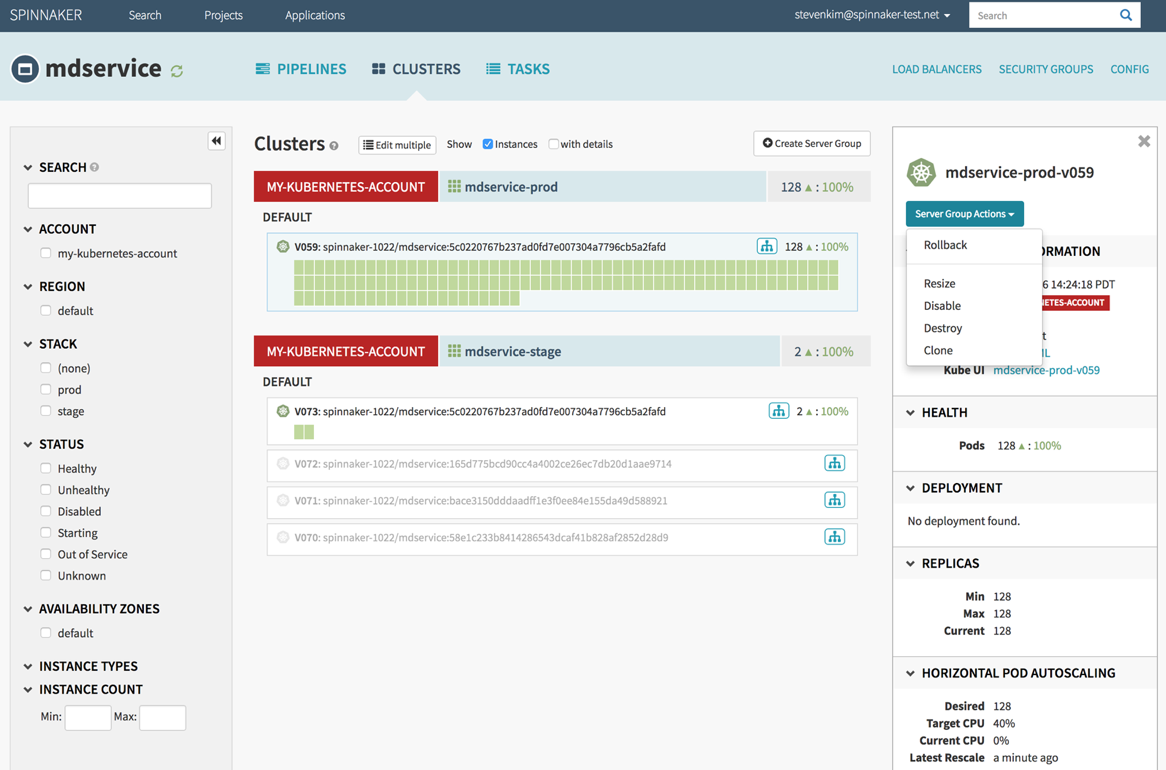 Enter Spinnaker. In addition to Kubernetes support, Spinnaker has many cloud provider integrations for continuous deployment eliminating the need for custom scripting wizardry around Kubernetes, and cloud providers’ APIs with Jenkins, CircleCI, or other CI tools (that weren’t built with continuous delivery in mind. Their primary purpose is continuous integration). With less points of possible failure (e.g. custom scripting for deployments), it really helps to make deployment process straightforward and reliable. There are many things that can go wrong, starting from API changes on the cloud provider or Kubernetes side, when your scripts suddenly stop working after a cluster was upgraded or migrated to another location, down to dependency package problems like a change in Python/JS/Ruby package on the executing node or container breaks all your scripted pipelines). Here is a diagram of Spinnaker’s role in a CI/CD workflow:
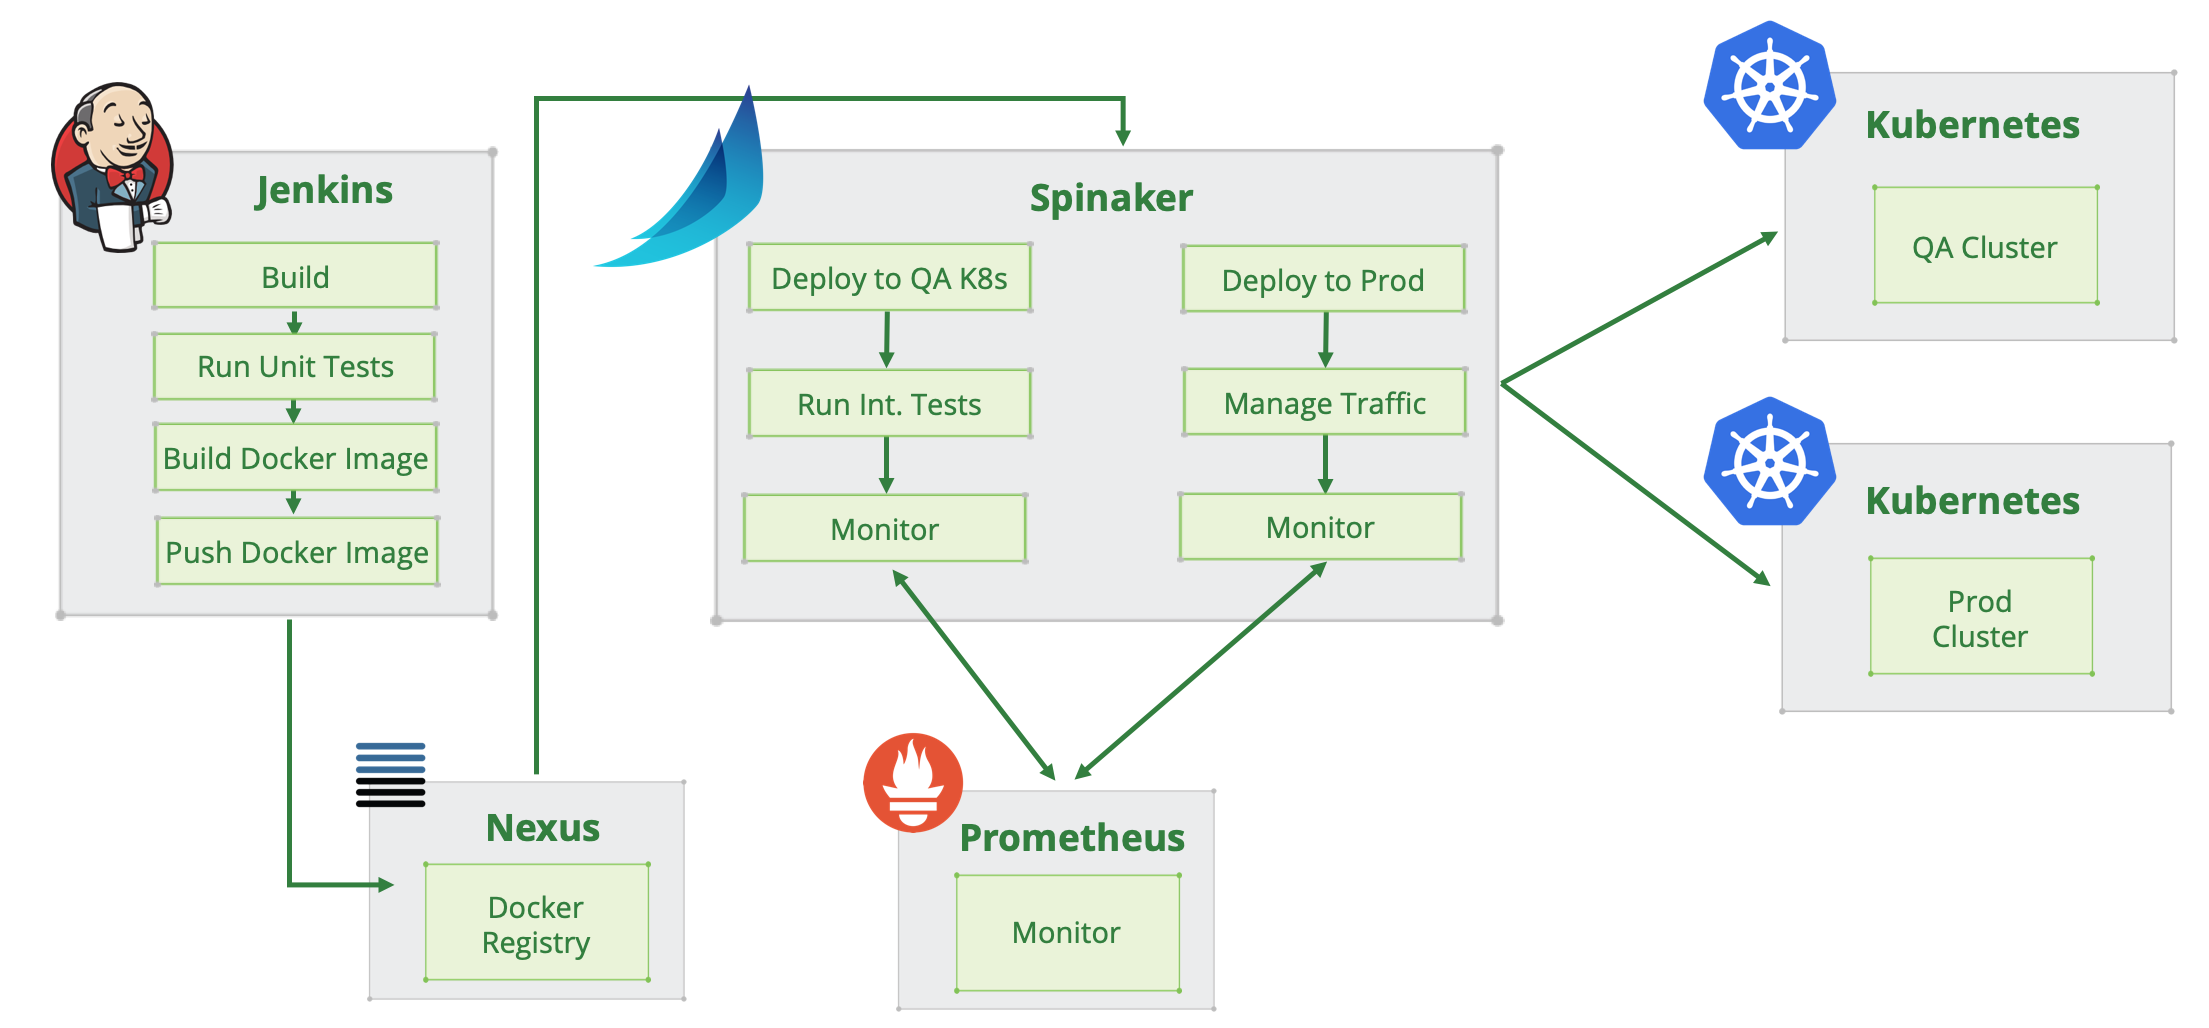
Spinnaker allows you to deploy to many clusters and cloud providers. To have a central point of release management for all Kubernetes clusters, even if these are spread across several cloud providers. Spinnaker can watch your git repo for changes in Kubernetes resource manifests, or watch a Docker registry (Dockerhub/ECR/GCR/Nexus/Artifactory) for new Docker images, and trigger pipeline execution based on specific rules configured for each environment. It also supports other storage locations for your Kubernetes manifests, so if Git is not the platform of choice for your Kubernetes manifests storage, Amazon S3 or GCS are also an option. The manifests can be used as is, in Kubernetes native format, or templatized with Helm. If you release applications using Helm Charts format, it’s easy to switch to Spinnaker deployment pipelines as Helm is supported out of the box. It will accept your charts and their values as an artifact for deployment, and render the final Kubernetes manifests behind the scenes, to apply them to your cluster. It’s basically the same as running “helm template” with your values and applying the rendered manifests to the cluster. Another important feature of Spinnaker is metrics integration: when a deployment pipeline runs, you can fetch metrics from Prometheus or Datadog (current supported systems) to verify the deployment works as expected, and make automatic decisions to promote the release candidate to production or some other stage, with no human intervention, which is a great benefit for your QA teams.
Let’s have a look at the components of Spinnaker cluster, this is a powerful framework and it consists of quite a lot of components:
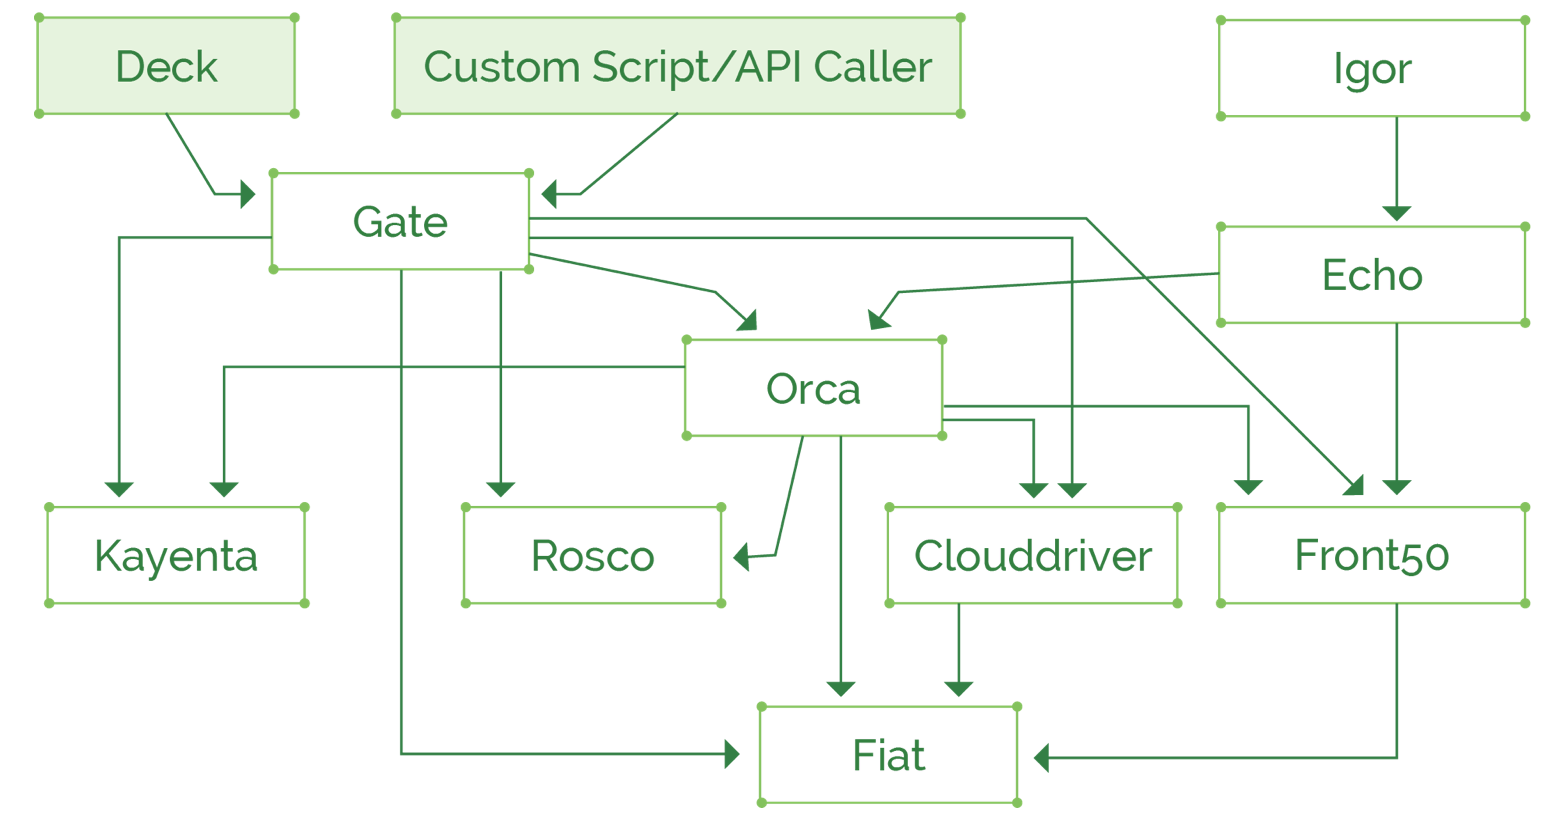
At first glance, the architecture of Spinnaker might be a little intimidating in terms of possible additional maintenance introduced into already complex Kubernetes cluster (especially with Istio enabled and possibly some more complex tools that you already use). It consists of a lot of components interconnected with each other, but to help install these, there’s an official setup tool named Halyard which is provided for easy installation of the correct configuration of Spinnaker that will suit your needs, it has a CLI command and good documentation of all options, so you will easily spin up a new Spinnaker deployment, either shared for all teams in the organization or separate if there’s a need to keep them physically separated and not just rely on access control settings within a single Spinnaker setup. In case of a very large scale production deployment, it’s recommended to set up Highly Available Spinnaker clusters.
Check out our hands-on tutorial with canary deployment demo using Istio and Spinnaker installed in a Kublr cluster. You’ll see how you can decide whether to increase traffic flow to a canary or even completely remove of the old deployment, based on Prometheus metrics. Below is a diagram of the release process that we will demonstrate:
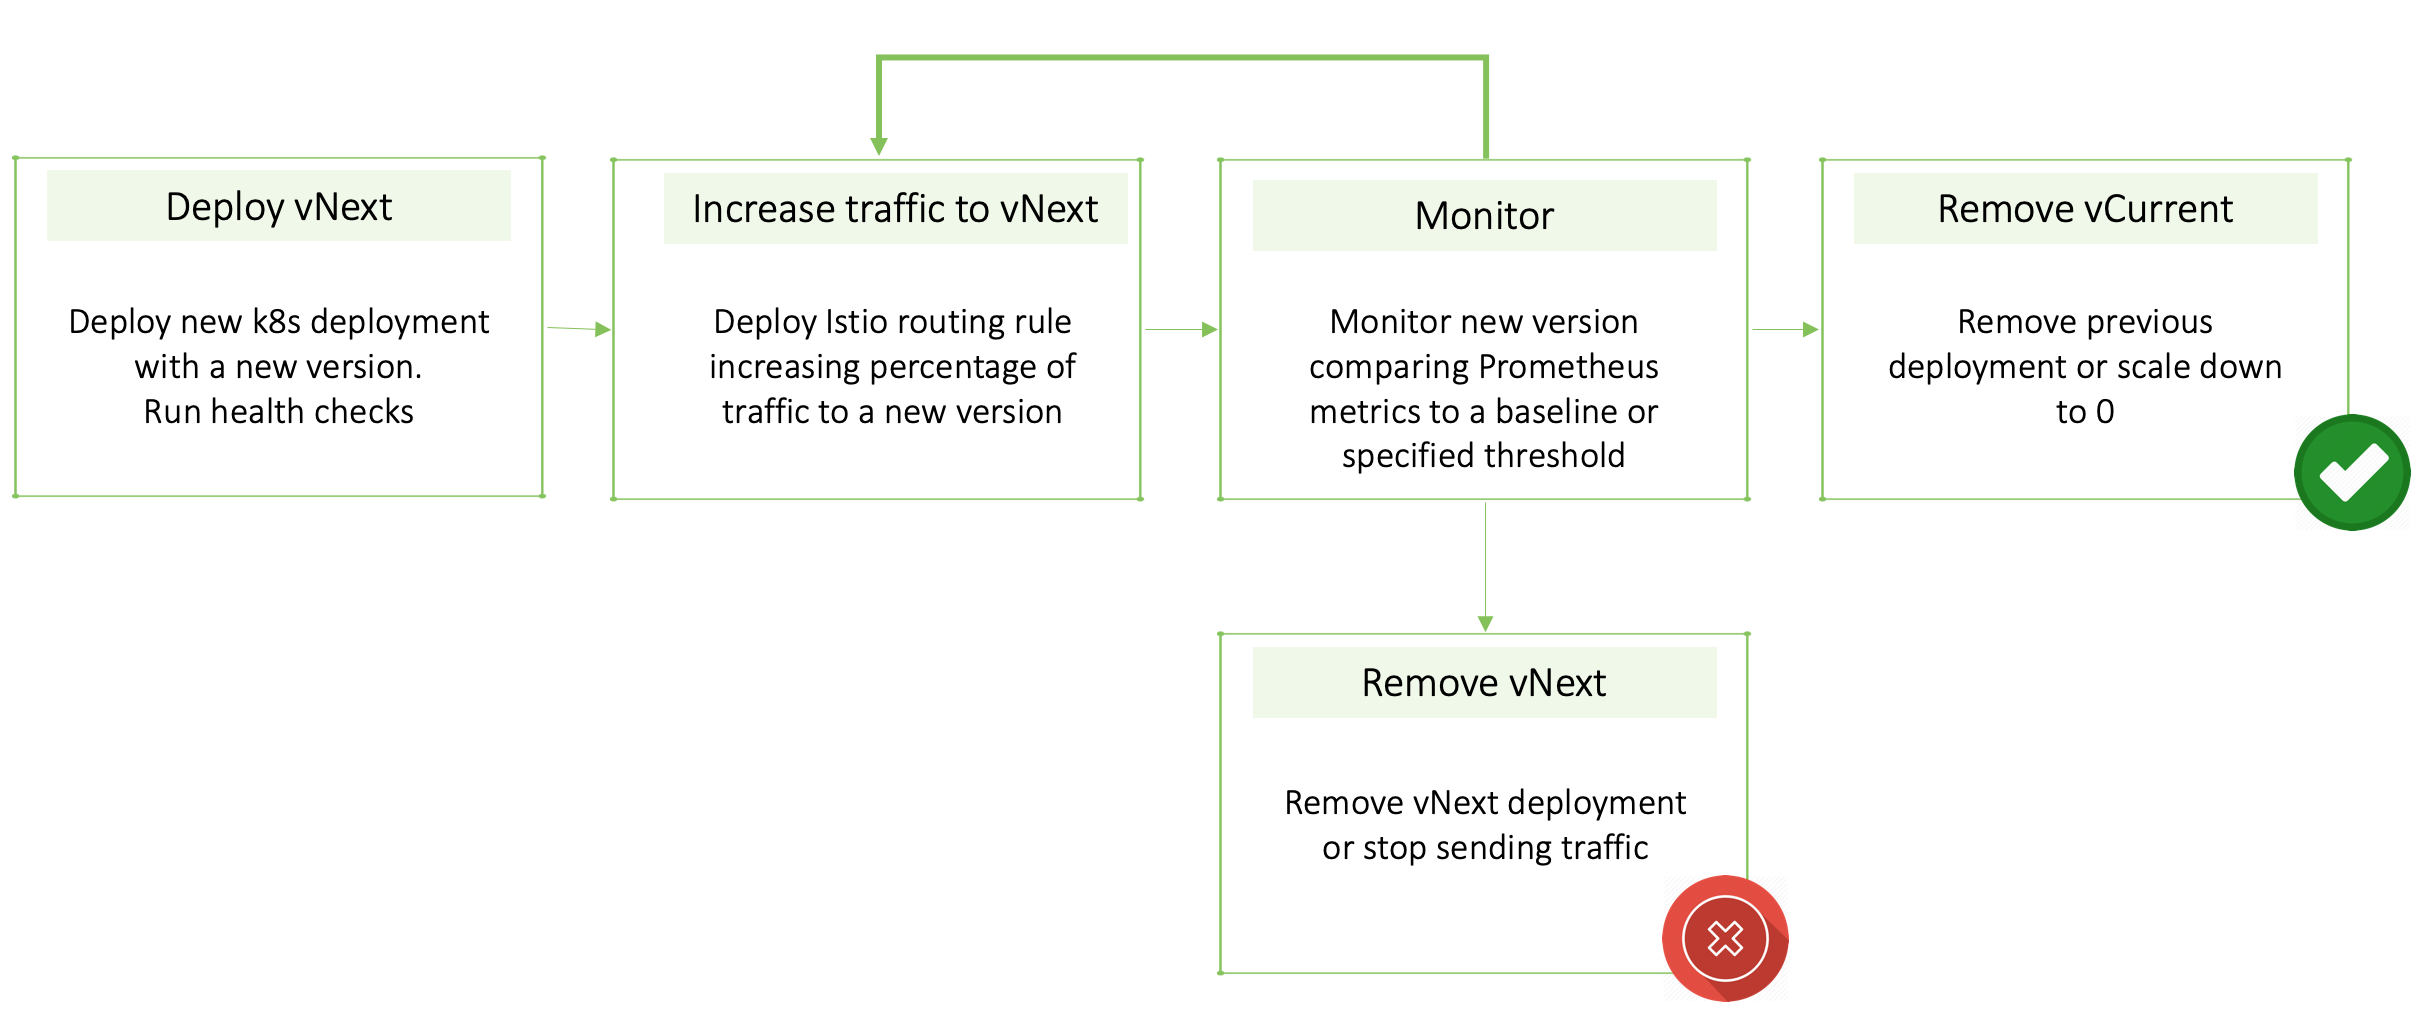
We will demonstrate the powerful monitoring integration of Spinnaker with Prometheus, used to make automatic decisions on the next steps to apply to the canary deployment. The deployment pipeline will consist of:
- Configuration of the automatic trigger for the pipeline
- Deployment to a canary environment
- Setting 5% of the traffic flow to a canary release
- Canary 5% analysis step that will read metrics from Prometheus and make a decision if to increase the traffic ratio to this canary or not
- Increasing canary traffic to 50%
- Canary 50% analysis, similar to the previous one, but this is an additional step in the pipeline
- Update production deployment, if the 50% analysis was successful
- Set canary traffic to 0%, after production was updated
- Summary reporting
While Kuberentes natively enables canary releases, it’s very basic and still requires manual work. For automated and fine-grained rollouts, you’ll need additional tools such as Spinnaker, Istio, and Prometheus. Have questions or topic suggestions? Ping us on Twitter. We’d love to hear your feedback.

