
Organizations who host a large portion of their infrastructure on Amazon Web Services (AWS) may eventually consider migrating to containers for a variety of reasons. If you’re considering migrating to containers, you’ve probably read about interesting open source frameworks like Rancher, Docker Swarm, DC/OS, Mesos and Marathon, Kubernetes, Nomad, and the native AWS service, EC2 Container Service (ECS).
In this post, we’ll compare the lesser-known ECS service of AWS with the more popular Kubernetes orchestrator. We’ll also use the Kublr platform to avoid manually installing and configuring Kubernetes.
After reading this post, you’ll understand the strengths and weaknesses of ECS. You’ll also see how containerized applications are supported natively on AWS without the need for external tools and clusters. (For example, the service discovery mechanism, based on Application Load Balancer, allows us to avoid using Consul/Zookeeper or a similar service discovery tool.)
EC2 Container Service Overview
ECS was announced in April 2015 as a very basic solution with limited features. ECS didn’t have a dynamic port mapping of containers to the host, which means that if you have 10 containers exposing port 80, for example, you can run only one such container per EC2 instance. An attempt to schedule a second container with port 80, on the same machine, would throw a “this port already in use on that instance” error, rendering the ECS service rather useless because it was impossible to place many containers of the same type on the same host.
Despite ECS not being feature rich at introduction, the Amazon team continued development and now it is a viable solution for containerized workloads. ECS has a very strong selling point: you don’t have to maintain a highly available, complex Kubernetes cluster by yourself, which is significant work when maintaining and upgrading a large multi-master Kubernetes cluster.
Instead, AWS takes care of everything related to ECS agent logic and scheduling decisions, with no need to install your own “master” nodes. Also, ECS automatically manages auto scaling based on CloudWatch alarms, allowing you to restrict access to Docker images with IAM policies and assign the IAM role to a container.
Besides the fact that you don’t have to worry about multi-master setup of the “brain” of your orchestration system (Kubernetes masters), there are few other benefits of using the ECS service over Kubernetes. The workload types ECS can handle are very basic, and features like connecting Application Load Balancer to route traffic to containers are available also for Kubernetes (due to the fact that Kubernetes has good integration with AWS, developed by many Kubernetes contributors). The things you can do with ECS and cannot do with Kubernetes are very few (and even those have “workarounds” built by the community, like the ability to use an IAM role in Kubernetes pod). In summary, the main reason to choose ECS over Kubernetes would only be the lack of capacity within the DevOps team to maintain their own highly available Kubernetes cluster. Even then, you may choose to use a service like Kublr to remove the complexity, allow you to benefit from all the Kubernetes ecosystem can offer, and avoid complex manual cluster maintenance.
To start using ECS, you simply create a “cluster”. In ECS terms this is a logical clustering unit, created with a few clicks through AWS console.
Next, install a simple ECS agent on all of your instances that need to connect to that cluster. Alternately, you can use a predefined AMI image that includes the ECS agent; this AMI also has a proper EBS data disk partition optimized for Docker. Upload your Docker images to the ECR image registry, and create a new Task Definition. The Task Definition defines your container settings like volumes, image name, environment variables, etc. If you’re familiar with Kubernetes, think of this as a “pod template”. You can read more about all the options available in a Task Definition; you’ll see these are the bare minimum to launch a Docker container.
Here is an example of a small ECS-based deployment
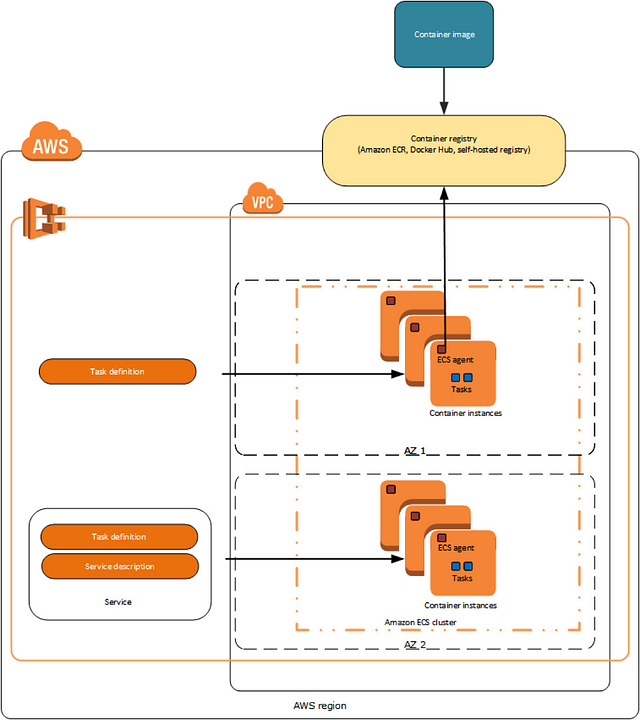
Here are a few important details about the main components of every ECS deployment
- ECS Cluster: This is a logical cluster of instances. You connect any chosen EC2 instance to a particular cluster to schedule the cluster tasks on the instance. There can be many logical “clusters” in your AWS account (current default soft limit is 1000 per region). These are simple metadata objects and do not cost anything; you pay only the regular EC2 price of used instances. But the container scheduling mechanism is based on clusters, so if you add one instance to cluster “A” and five instances to cluster “B”, any task definition launched into cluster “A” will only be able to run on that one machine in cluster “A” and will never scale or move to machines of cluster “B”. Autoscaling only runs tasks within a single ECS cluster.
- ECS instances: These are EC2 instances you connect to an ECS cluster by defining the cluster name in the “/etc/ecs/ecs.config” file. The ECS agent will connect to a cluster and communicate about available resources of the instance, receiving signals back from the cluster about the containers it has to run.
- Task Definitions: These are container definitions with few features. One feature to note: you can constrain a task to run only on instances that have a particular “attribute”. There are a few built-in attributes such as “availability zone” and “instance type”, which automatically exist for each ECS instance, but you can add “Custom attributes” to your instances (for example, “production”, “QA”, “development”). You can read more about constraints.
- Task: This is a running job created from a Task Definition. It may contain one or more running containers.
- Scheduled Task: This is the same as a standalone task, but will run repeatedly on the schedule specified in CloudWatch Events.
- Services: These are similar to a “replica set” of “deployment” in Kubernetes. A Service maintains a given number of replicas running and restarts failed tasks when needed. It can be connected to a load balancer like ELB or ALB, automatically writing the rules into load balancer settings when tasks are added or removed and ensuring the load balancer always knows which containers it needs to point to and at which ports on the instances. In the next section, we’ll do a quick tutorial to introduce ECS Services and other components of ECS.
- ECR registry: This is similar to any other Docker registry, where you can upload and store your images. You have an option to restrict access to images and repositories based on IAM users and roles. You can learn more about related IAM policies.
Now that you have a basic understanding of ECS terminology, we can compare ECS to Kubernetes
| Kubernetes | ECS |
| Kubernetes cluster and its “Namespaces”. The Namespace is a logical separation to “Virtual clusters”, and allows access control for users and quota limits. Used in service discovery as part of a DNS name which leads to a deployed service. Cluster worker nodes are shared by all Namespaces by default, but network separation is also possible to tighten security within the same cluster (in addition to RBAC roles security). | ECS Cluster. Both a logical and physical separation of deployments and services. All instances assigned to a cluster can be used only by that cluster. |
| Kubernetes “Master” nodes contain the components that do the logic of scheduling and replacing pods, storing and updating cluster state, exposing the API to other components like the dashboard, interacting with the underlying cloud API to provision resources, and more. Here is a list of master node components. | No counterpart |
| Kubernetes worker “Node”, a server or cloud instance that runs the workloads. | ECS Instance. An EC2 instance connected to a cluster. |
| Kubernetes “Pod definition”, a manifest describing containers to run. Holds all details of container configuration, and used as a template to “spawn” one or more replicas of described containers to the worker nodes. | ECS Task Definition. The template for Tasks. |
| Kubernetes “Pod”, a set of one or more running containers. | ECS Task. Running workload, can have one or more containers. |
| Kubernetes “Cron Job”, will run any pod on schedule. | ECS Scheduled Task. Run selected tasks on schedule. |
| Kubernetes “Deployment”, a resource that takes care of running a particular set of containers at all time. Auto scales based on metrics, and performs rolling updates when a new version of a pod is deployed. Kubernetes deployment is much more feature rich than ECS Service. | ECS Service. Contains the deployment settings (which Task Definition to use), auto scaling policy, and determines which load balancer to connect running nodes to. |
| Kubernetes “Service“, an internal load balancer that features an easy to use service discovery using a DNS format of “service-name.namespace.svc.cluster.local” and “pod-ip-address.my-namespace.pod.cluster.local”. | No counterpart |
| Kubernetes “Stateful Set”, a deployment model with statically named pods, which will start in strict order, allowing for bootstrap and auto-heal of a stateful service like database. | No counterpart |
| Kubernetes “Daemon Set”, a type of task which will run a single instance of a pod on every node in a cluster. Useful for log collectors, network plugins, and any “sidecars” that have to run on each node. | No counterpart |
| Kubernetes “Persistent volume claim”, a definition of disk resources needed for a pod. Can be used by pods to claim particular disk space on a storage type of choice. | No counterpart |
ECS Tutorial
First, go to EC2 Container Service, and click “Create Cluster” to create a new cluster. Enter the name, and select the instance size that will be launched and attached to this cluster (or select “Create an empty cluster” if you already have EC2 instances that you plan to attach). Select the VPC, subnet, IAM role for that instance, and security groups. (You can also create new components if you don’t have this existing infrastructure yet.)
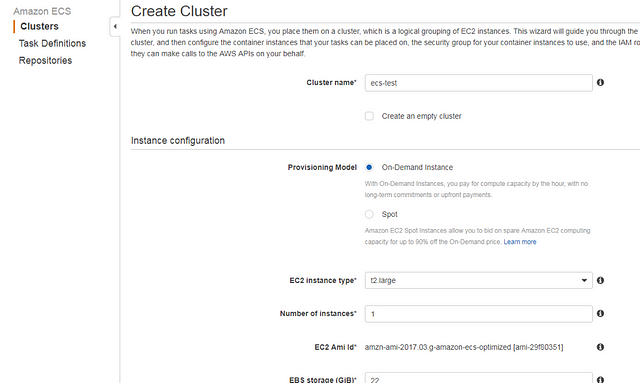
Note that ECS instances should have a few basic rules in the IAM policy that allow the agent to interact with the ECS API. You have two options: use the default suggested ecsInstanceRole, or add the necessary rules from this policy to one of your existing policies.

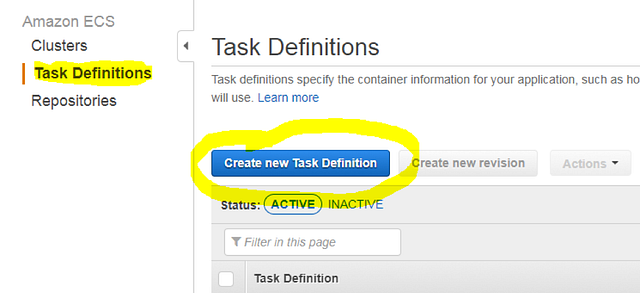
When the cluster is ready, select the cluster to navigate to its settings. You will see the main ECS cluster tabs, which represent all components of that cluster. Before we can launch any container, a Task Definition must be created. Navigate to Task Definitions and create a new definition.
You will be presented with the following options:
- Task Name: The identifier you will use in a new service, or in a single standalone\scheduled task, in your selected ECS cluster.
- Task Role: Select any custom IAM role for the containers in this task to allow access to other AWS resources without relying on Instance Role. The containers can access the underlying instance profile permissions by default, so the best practice is to limit ECS instance role permissions to the minimum (preferably just use the default), and add all extra permissions on a per Task Definition basis. If you are considering running production on ECS, read about the benefits of fine grained IAM roles for Tasks, or review the Topics links here to better understand ECS security, and learn to plan your policies and interaction between all microservices in the cluster. Security is a complex topic, regardless of which container cluster type is used.
- Network Mode: Usually you will use the “Bridge” mode if your service is exposed to the world, and you’ll use dynamic port mapping so that you can schedule many containers listening on the same port (like 80) and running on the same instance. ECS will map container ports to random host ports. Choose “Host” mode if you will not use dynamic port mapping; this is only recommended for increased networking performance, but you will have only one container allowed to listen on a particular port. You might want to use this in a setup where you allow a single container to occupy all EC2 instance resources (like a heavy loaded Elasticsearch, or a similar network- and CPU-intensive application that was containerized for reasons other than rising resource utilization).
- Container Definitions: Here you will add the containers that this task will launch. We’ll not describe this in detail because these are the same options found within any Docker container. The few settings that are unique to ECS will be described in the next step when we create a container.
- Constraint: This can be used to constrain a task to run on particular instances.
- Volumes: If you first fill in the “container” settings and then try to select a volume to mount, you will see an empty list of options (see below). You first need to create a volume on the main Task Definition page, and it will display in that list on the “container definition” page.

Here it is worth noting the weakness of the ECS volumes feature compared to the numerous options in Kubernetes. In ECS you have to download any needed files to the ECS instance yourself if you want to make use of a docker volume mount with those files. These can be config files with options, templates needed by your containers, or secret credentials you have to inject during runtime. There are no options similar to what is available in Kubernetes, like a “Config Map” or “Secret” resource, which can be used as a volume mount later. These are incredibly useful features: a quick search in Helm Charts repo on GitHub for “config map” keyword returns about 148 results, which means almost every predefined Kubernetes package uses a config map feature. It is very convenient to keep configuration templates in your service definition that you can mount as a file into a container. This option doesn’t exist in ECS. The only type of volume available in ECS Task Definition is a “host path”, where you specify the instance folder path to be mounted as a Docker volume.
Let’s create a simple demo service that will run our “ecs_green” container. Name the task “green”, and click “Add Container”.
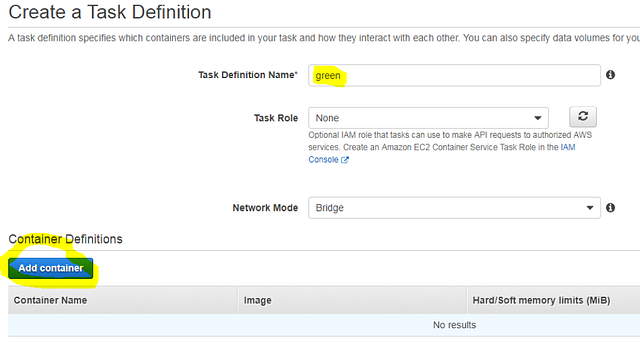
Complete the following fields:
- Container Name: green
- Image: aquamarine/kublr-tutorial-images:ecs_green
- Memory Limit: set 512 hard limit (indicating 512MB of RAM maximum for container)
- Port Mapping: fill in only the “Container port” with “80”, leaving the “Host port” blank, because we will use dynamic port mapping and we do not know the host port in advance.
This is all we need to launch our simple web page container. Note an important logging setting: it has the default Docker logging options, but not many are familiar with all available options, so you may find it useful. You will probably need to collect logs from all your containers, and there is an option to stream logs to CloudWatch, Graylog (GELF), syslog\journald, Splunk, fluentd, or a plain JSON file on the host instance.
For CloudWatch, you can set the group, region, and “stream prefix” to be able to identify particular service logs later.

At this stage, you can leave the log configuration at “

Click “Create” to complete the creation of this Task Definition. You’ll see the following result if you completed all options correctly:
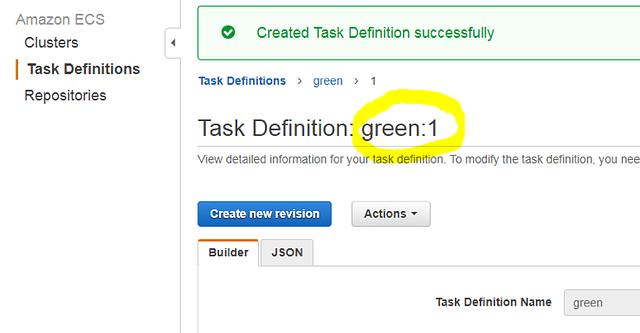
Note the “green:1” name: each Task Definition is identified by a revision number. When you launch the Definition in a Service or Task, you must specify that number.
ECS Service Deployment
Now we will create the “Service” for our “green” container.
A Service can scale out by launching more Tasks, based on CloudWatch Alarms (CPU/RAM/Latency), and will keep a stable number of running tasks in the Cluster. Unfortunately, you cannot change your Load Balancer association of a Service after creation. Instead, you must delete the old Service and create a new one. There is no flexibility like we have in Kubernetes with its Ingress and services routing, which can be mixed and matched on the fly with live traffic without losing a single connection. (Kubernetes provides even more complex integrations like linkerd for advanced features such as gRPC routing, automatic retries, and detailed requests tracing.)
To begin, click the “Create” button on the “Services” tab to create a new service.

Complete the following fields:
- Task Definition: “green:1”
- Service Name: “green-service” (or whatever you prefer)
- Number of tasks: 2 (Number of replicas to run; you can also set this at 1. We will not be testing load balancing; this is a simple demonstration of basics and navigation across all resources.)
Leave the “Task placement” setting at the default value. This setting allows you to select placement strategy; the ECS will either try to spread the containers to many different instances for high-availability or pack them tight into as few instances as possible for better resource utilization.
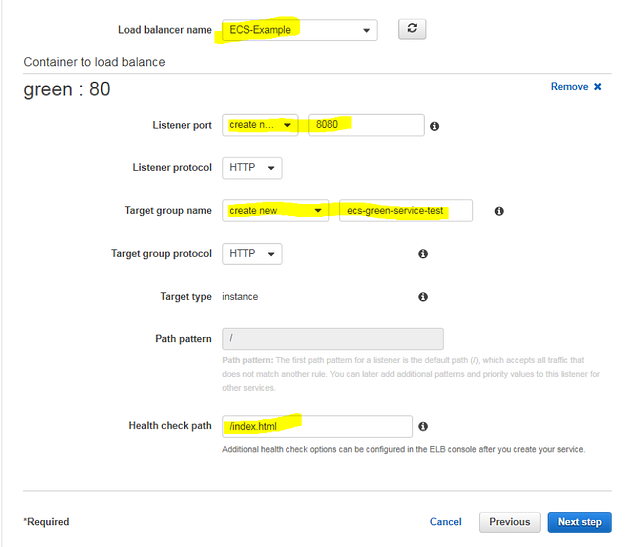
Click “Next Step” to see the load balancing options. Now, if you already have an existing Application Load Balancer, you can use it in this example, being careful not to override your existing “path based” route by accurately filling in a unique new path in the “Path pattern” field. The ALB association basically just adds a single “Path rule” to your ALB listener to route traffic to our ECS service instances listed in the Target Group. (We create a new Target Group here on this settings page.)
To proceed, create a default ALB with basic settings, or select an existing one if you prefer. Select “Application load balancer” and complete the ALB name (the selection box shows all your existing ALBs in that region), preferred listener (external ALB port), Target Group name, and Path pattern which will route to containers of that ECS Service. To learn more about all listed options, read the Application Load Balancer documentation.
Click “Next step” to view the Auto scaling options. We could select “Configure service autoscaling” and configure CloudWatch alarms that will trigger the scale out or scale in operations for our Tasks (and later also configure the underlying instances auto scaling), but this is beyond the scope of this basic tutorial. You can read more about Service tasks auto scaling and EC2 instances auto scaling for ECS clusters.
Click “Next step” to see the summary of all selected settings and, if everything looks correct, click “Create service”. You will see this screen if the service was created:

Click the “View Service” button and navigate to the “Tasks” tab to see your container running. You will see a RUNNING state in the “Last status” column. So, do we have our “Green” website up and running? Not necessarily: this indication can be misleading. The status may seem to indicate “your container is up, and passed a health check” (as you would expect in a Kubernetes pod status indication) but in ECS this indicates the container is started, but does not indicate the health of the container.
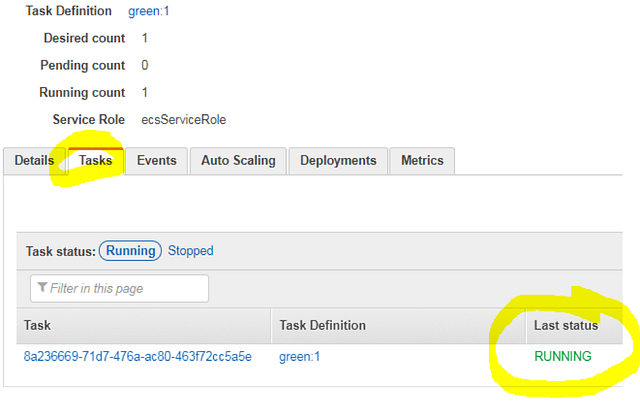
Even if you launch a container that is not configured properly, you will see the “RUNNING” status here. To determine if your health checks passed, you must either navigate to the Target Group (where the EC2 instances are registered) and see if the “targets” are in a healthy state, or go to the “Events” tab as shown below and try to detect the pattern of a container failing and restarting in a loop.
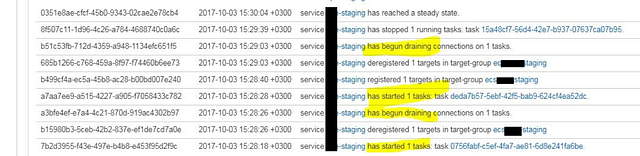
Note: this screenshot above is from a service other than my actual working “staging” cluster, because our “ecs_green” website in this tutorial is running properly.
The ECS service will continue to reschedule a failing container in an infinite loop until you detect this behavior by your own external means, either by scripting against the ECS API to analyze its Event log messages or by using an automatic CloudWatch alarm creation script to monitor your Target Groups instances health state change. This can also be done with AWS Lambda to detect an event of a new ECS service creation and generate those additional CloudWatch alarms for a newly created Target Group. This is very inconvenient. In summary, proper failure detection and recovery mechanisms are missing from ECS.
In addition, be careful in using the “Update” button at the top to update a setting in a previous action.
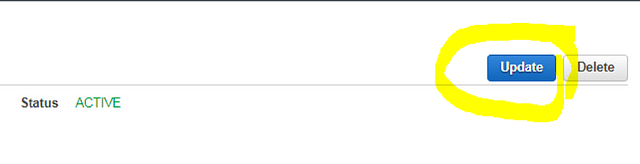
When you “update” a service and “save” it, the browser takes you from inside the “service settings” page to the parent “cluster settings” page. So your next click in that corner will delete the whole ECS cluster**,** after a quick confirmation message box that doesn’t even prompt you to type in the cluster name. (This is a safety measure used in many services when deleting an important global resource. AWS has a “type the name” confirmation on S3 bucket deletion, but surprisingly they don’t have this protection on ECS cluster, which could be hosting all your company production workloads.) Be careful: you could ignore that warning box and click the “convenient red button” just to get rid of it, especially when troubleshooting an urgent production issue.
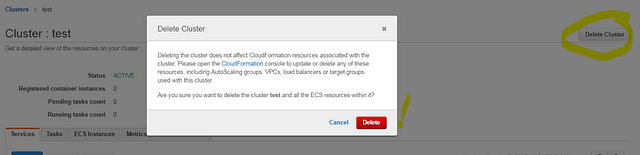
Despite the AWS documentation indicating it’s impossible to delete a cluster before cleaning up all tasks and services first, a click on that red button will display only a window of “deleting tasks… deleting services… deleting cluster…”, and then all services and configurations are gone. This includes the auto scaling settings of all services, load balancer associations, running tasks, instances association with that cluster, and so on. The only elements remaining are the underlying EC2 instances; this operation doesn’t terminate them.
Within a few seconds you will see this message:

Now let’s go back to our successfully deployed “ecs_green” container. To see the website, check your Application Load Balancer DNS name in EC2 settings, and navigate to that address with port 8080 added if you followed the example, or use whatever you configured during that ALB association stage on the ECS service creation page.
The example page will look like this:
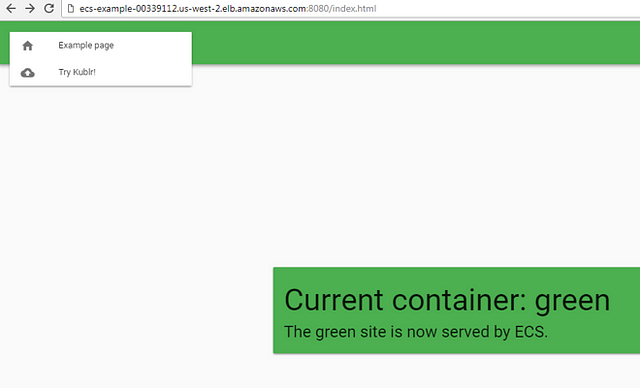
This completes the introduction to ECS tutorial.
To summarize, the possible benefits of using ECS on Amazon cloud are:
- There is no need to maintain and monitor a complex master setup. Amazon takes care of this, all you have is EC2 instances with agent, and AWS handles all the ECS logic behind the scenes, exposing API and basic metrics (like cluster CPU/RAM reservation and utilization, and “per service” metrics of same type). This is very basic; you can’t see a particular Task or container utilization metrics, only the “Service wide” utilization.
- The option to utilize AWS Lambda to detect events happening with ECS cluster and services and react to them. For example, you can notify your On-Call system about suspicious behavior of a service (like restarting in infinite loop).
- You have integration with CloudWatch, ALB, and IAM roles. Note that Kubernetes also has integration with both CloudWatch and Application Load Balancer (using ALB ingress controller), and using IAM roles for both pods or nodes is not an issue.