
As organizations grow and mature, so does the organization’s data. Eventually, the data may become too ‘big’ or too complicated for traditional analytics tools. This growth and resulting challenge has led to many well-established artificial intelligence (AI) applications in the marketplace.
The hype about AI technologies is big: everyone is talking about how AI will revolutionize our lives, touch every home, and solve all our problems. But the promise of AI is not always realized. How can your organization make the leap to AI nirvana?
As an enterprise, your infrastructure is likely rather traditional, and your classic service-based solutions are developed and run within a perfectly adjusted workflow that must be maintained. To adopt AI technology, you must find a way to leverage this technology while making the technology compatible with your internal workflows.
In this post, we’ll show you how Shiny (R) can help you adopt and integrate AI technology.
There are two main programming languages for an AI/data analysis: Python and R. Both languages need a wrapping framework (for example, Flask for Python or Shiny for R) for interaction and visualization.
Shiny (R) is powerful and user-friendly tool, which is why we recommend a continuous integration and continuous deployment (CI/CD) approach for a Shiny (R)-in-Kubernetes cloud solution.
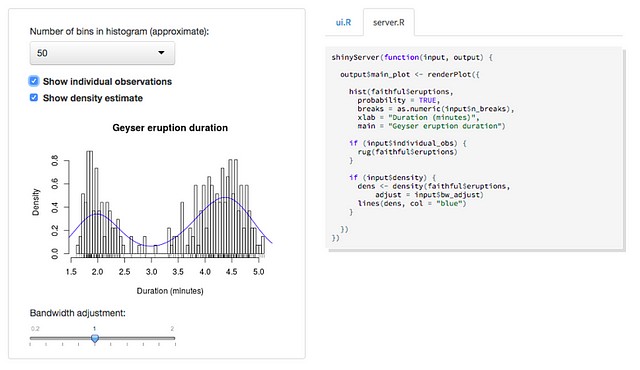
Here is a Shiny (R) example:
This is the big-picture view of a typical Shiny (R) development flow:
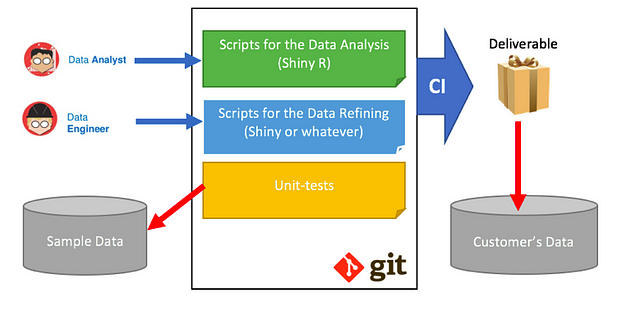
The R project is basically a bunch of scripts. We must add these scripts to the Docker Image, and either configure a connection to a database or mount a disk volume with data to analyze.
Next, we run unit tests to ensure they are working properly. We’ve chosen Jenkins because it’s already a part of the technology stack in our project. (We use Jenkins to build and deliver developed services.)
Here’s how this process works:

To implement this scenario, we will:
- Build a Docker Image with Jenkins, Docker, and Kubernetes Control Bundled.
- Build a Shiny (R) Docker Image.
- Deploy Shiny (R) and Jenkins in Kubernetes.
- Configure Jenkins.
Build a Docker Image with Jenkins, Docker, and Kubernetes Control Bundled
We have created a Docker file from the official Jenkins Docker Image (jenkins/jenkins:lts).
Inside the Kubernetes cluster, you are basically in a Docker-inside-Docker situation. Install the Docker CE and pass-through /var/run/docker.sock from Kubernetes (so we share the same Docker Agent).
You must also install Kubectl to control the Kubernetes cluster. To do this, place the Kubernetes “config” file into the user’s home directory in order to have access to the cluster without any additional setup.
The resulting Docker file for our Jenkins will look like this:
FROM jenkins/jenkins:lts

EXPOSE 8080 50000

USER root

# Install prerequisites for Docker
RUN apt-get update && apt-get install -y sudo iptables libsystemd-journal0 init-system-helpers libapparmor1 libltdl7 libseccomp2 libdevmapper1.02.1 && rm -rf /var/lib/apt/lists/*

ENV DOCKER_VERSION=docker-ce_17.03.0~ce-0~ubuntu-trusty_amd64.deb
ENV KUBERNETES_VERSION=v1.6.6

# Set up Docker
RUN wget https://download.docker.com/linux/ubuntu/dists/trusty/pool/stable/amd64/$DOCKER_VERSION
RUN dpkg -i $DOCKER_VERSION

# Set up Kubernetes
RUN curl -LO https://storage.googleapis.com/kubernetes-release/release/$KUBERNETES_VERSION/bin/linux/amd64/kubectl
RUN chmod +x ./kubectl
RUN mv ./kubectl /usr/local/bin/kubectl

# Configure access to the Kubernetes Cluster
ADD install/config ~/.kube

ENTRYPOINT ["/bin/tini", "--", "/usr/local/bin/jenkins.sh"]
Build a Shiny (R) Docker Image
You can speed up the building process of new Docker Images by inheriting from the base Docker Image (with just Shiny (R), named “shiny-r”) and the deployment Docker Image (inherited from the base one and named “shiny-r-bundle”).
For the base Docker Image, we use a CentOS 6.6 because we plan to use the Shiny Server for a CentOS 6. Our next steps are:
- Install R (from yum repository).
- Install database access libraries (unixodbc, freetds).
- Override some options in the .Rprofile file.
- Install the required R packages: shiny, markdown (for reporting), testthat (for unit tests).
- Install ‘RODBC’ R package (for database access).
- Install an open-source version of the Shiny Server.
The base Dockerfile for Shiny (R) is:
FROM centos:6.6

RUN rpm -Uvh http://download.fedoraproject.org/pub/epel/6/i386/epel-release-6-8.noarch.rpm
RUN yum -y install yum-plugin-ovl
RUN yum -y install R
RUN yum -y install unixodbc freetds

RUN echo "options(repos = c(CRAN = \"https://cran.rstudio.com\"))" > ~/.Rprofile

RUN R -e "install.packages('shiny')"
RUN R -e "install.packages('rmarkdown')"
RUN R -e "install.packages('testthat')"
RUN R -e "install.packages('RODBC', type = 'source')"
RUN R -e "sessionInfo()"

ENV R_STUDIO_VERSION=shiny-server-1.5.4.858-rh6-x86_64.rpm
RUN curl https://download3.rstudio.org/centos6.3/x86_64/$R_STUDIO_VERSION > $R_STUDIO_VERSION
RUN yum clean all; yum -y install --nogpgcheck $R_STUDIO_VERSION.

EXPOSE 3838

CMD ["/opt/shiny-server/bin/shiny-server"]
In order for the Shiny to work, install the ‘shiny’ and ‘markdown’ packages. ‘Testthat’ will be used for unit testing, and ‘RODBC’ will be used for accessing traditional RDBMS.
To deploy the Shiny (R) project, create the inherited Docker Image, which will also conduct unit tests during the build:
FROM some-registry.com/shiny-r:latest

COPY config/* /usr/local/etc/

RUN rm /srv/shiny-server/index.html
RUN rm -rf /srv/shiny-server/sample-apps
COPY install /srv/shiny-server

RUN echo; echo "TESTS:"; \
    for file in $(find /srv/shiny-server -name TEST_RUNNER.R);  \
    do  \
      echo "     --------- RUN TEST: $file -------------"; \
      cd $(dirname "$file"); \
      R --quiet --no-save < $file; \
    done

CMD ["/opt/shiny-server/bin/shiny-server"]
Supply test runner scripts for every R project (named ‘TEST-RUNNER.R’), and execute these scripts during the build of the Docker Image.
Example of “TEST_RUNNER.R”:
library('testthat')
source('server.R')
test_dir('tests', reporter = 'Summary')
This test runner verifies ‘server.R’ executing all testing scripts in the directory ‘tests’.
Example of an R unit test (‘test/test_server.R’):
expect_that(Fibonacci(-1), throws_error())
expect_that(Fibonacci(0) == 0, is_true())
expect_that(Fibonacci(1) == 1, is_true())
expect_that(Fibonacci(2) == 1, is_true())
expect_that(Fibonacci(10) == 55, is_true())
Deploy Shiny (R) and Jenkins in Kubernetes
To deploy Shiny (R) and Jenkins into the Kubernetes cluster, we must supply deployment and service definitions:
apiVersion: extensions/v1beta1
kind: Deployment
metadata:
  name: shiny-r
  namespace: default
  labels:
    app: shiny-r
spec:
  replicas: 1
  template:
    metadata:
      labels:
        app: shiny-r
    spec:
      containers:
      - name: shiny-r
        imagePullPolicy: Always
        image: some-registry.com/shiny-r-bundle:latest
        ports:
        - containerPort: 3838
        resources:
          limits:
            cpu: 100m
            memory: 4Gi
          requests:
            cpu: 100m
            memory: 4Gi
        readinessProbe:
          httpGet:
            path: /
            port: 3838
        volumeMounts:
        - name: shiny-r-storage
          mountPath: /opt/shiny
      volumes:
      - name: shiny-r-storage
---
apiVersion: v1
kind: Service
metadata:
  name: shiny-r-service
  namespace: default
  labels:
    app: shiny-r
spec:
  type: LoadBalancer
  ports:
    - port: 3838
  selector:
    app: shiny-r

apiVersion: extensions/v1beta1
kind: Deployment
metadata:
 name: jenkins-ci
spec:
 replicas: 1
 template:
 metadata:
 labels:
 name: jenkins-ci
 spec:
containers:
 - name: jenkins-ci
 imagePullPolicy: Always
 image: some-registry.com/jenkins-ci:latest
 ports:
 - containerPort: 8080
 - containerPort: 50000
 readinessProbe:
 tcpSocket:
 port: 8080
 initialDelaySeconds: 40
 periodSeconds: 20
 securityContext:
 privileged: true
 volumeMounts:
 - mountPath: /var/run
 name: docker-sock
 volumes:
 - name: docker-sock
 hostPath:
 path: /var/run
---
apiVersion: v1
kind: Service
metadata:
 name: jenkins-ci-lb
spec:
 type: LoadBalancer
 ports:
 - name: jenkins
 port: 8080
 targetPort: 8080
 - name: jenkins-agent
 port: 50000
 targetPort: 50000
 selector:
 name: jenkins-ci
Note:
- You will need one Jenkins node for very low hardware requirements. Two 2 CPU cores and 512M RAM should be sufficient.
- Determine the number of Shiny (R) instances based on the number of active users and high-availability requirements. Shiny (R) nodes should not starve on computing power: ensure you provide maximum available CPU cores and enough RAM.
- In case of the multiple Shiny (R) nodes, you must use a “sticky sessions” in your load balancing (for example, using the Ingres Service instead of the LoadBalancer service).
Configure Jenkins
Make the following two low-level configurations before starting to work with Jenkins in Kubernetes:
- Set parameter excludeClientIPFromCrumb=true in the file /var/jenkins_home/config.xml to fix a “No valid crumb was included in the request” error.
- Do a “docker login” so Jenkins’ Docker should login and use the correct Docker Registry.
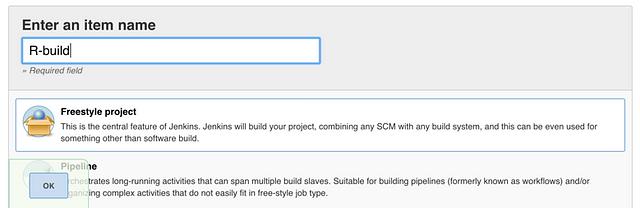
Now we can create the new Jenkins project:
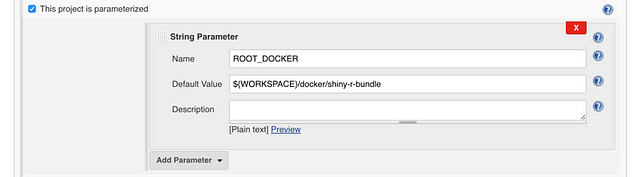
Next, we add the build parameter:
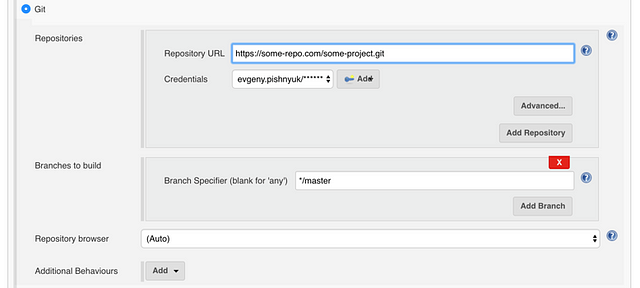
Then we configure access to the source code repository:
And, finally, we add a build step:
cp -r r/* $ROOT_DOCKER/install

#Docker build and publish
DOCKER_NAME="shiny-r-bundle"
DOCKER_IMAGE="some-registry.com/$DOCKER_NAME:$BUILD_NUMBER"
cd $ROOT_DOCKER
docker pull some-registry.com/shiny-r
docker build -t $DOCKER_NAME .
docker tag $DOCKER_NAME $DOCKER_IMAGE
docker push $DOCKER_IMAGE

#Kubernetes redeploy
kubectl set image deployment/shiny-r shiny-r=$DOCKER_IMAGE
In this script, we copy R script files, rebuild the ‘shiny-r-bundle‘ Docker Image, and rollout a new Docker Image in the Kubernetes cluster.
Conclusion
Let’s take a look at the results of our efforts. In this example, we’ve set up git polling for every minute (cron expression ‘* * * * *’), and we have committed some code changes to this repository.
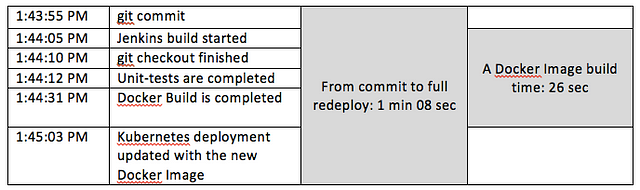
Redeploying in one minute is a great result for a CI/CD, giving us a large time reserve for the rigorous unit tests. Check out our on Running Spark with Jupyter Notebook & HDFS on Kubernetes to learn more about running data science worklaod on Kubernetes.
Interested in simplifying the management of your Kubernetes cluster? Consider using a Kubernetes management platform such as Kublr.