
As the second part in our series of Istio service mesh tutorials, this article provides step-by-step instructions for canary deployments of service mesh using Kublr-in-a-Box. With Kublr-in-a-Box you can create a new Kubernetes cluster on AWS, Azure, GCP, or on prem and experiment with Istio.
If you want to understand the theory behind service mesh, possible use cases, and the benefits of service mesh for both operation teams and developers, review part one of the tutorial where we also demonstrated the installation of service mesh into a Kubernetes cluster.
For this tutorial, if you do not have a running test or development cluster where you can experiment with Istio, you may wish to try “Kublr in a box,” our self-hosted cluster manager. Kublr in a box allows you to create a new Kubernetes cluster on AWS or Azure cloud, or a bare metal server, which can be the local machine with VirtualBox.
Starting with an active Kubernetes cluster with two or more nodes (for example, virtual machines on the same laptop), follow the “Quick Start” guide on Istio website to install the service mesh to your cluster.
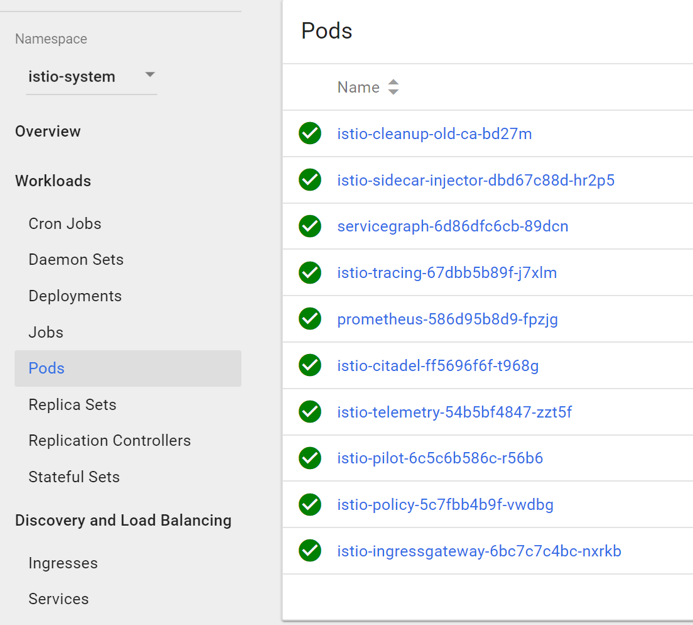
After installation your cluster “istio-system” namespace should look something like this when you navigate to the Pods Overview:
We will use an automatic sidecar injector, to avoid adding the Istio sidecar configurations manually into a local YAML file for each deployment. The manual option with “istio kube-inject” command was demonstrated in the previous tutorial. If your Kubernetes cluster is below version 1.9, you should still use the manual method before running “kubectl create” on a YAML file in the next steps of the tutorial.
Intelligent routing, canary deployment
For this part of the tutorial our scenario requires a canary deployment strategy on an existing cluster (instead of testing our application on staging environment):
Imagine your organization has hundreds of microservices, dependent on several large data warehouses like Hadoop. Or the application has other specific requirements which will cause you to replicate massive amounts of data and use a large amount of resources and budget to keep a stand-alone “staging” cluster for testing the application. Keeping this staging environment is prohibitive. Instead, you’ll use a canary deployment with intelligent request routing achieved by Istio service mesh on top of Kubernetes.
Starting with the demo application from the previous article, which has three versions of pods, each represents a different release of application components, part of the “complex application” described in the scenario. We need to test a new release on existing production cluster without affecting any real customers and users, however, we want to utilize the exact same data clusters and other dependent microservices, as if it was a real production release. That is why we are not testing it on separate staging environment but instead doing a canary deployment.
First, create the “service” to route traffic to pods and “version 1” deployment with four replicas. It imitates a production deployment. Save the following to “my-application.yaml” file:
---
apiVersion: apps/v1beta1
kind: Deployment
metadata:
  name: web-v1
  namespace: default
spec:
  replicas: 4
  template:
    metadata:
      labels:
        app: website
        version: website-version-1
    spec:
      containers:
      - name: website-version-1
        image: kublr/kublr-tutorial-images:v1
        resources:
          requests:
            cpu: 0.1
            memory: 200
---
apiVersion: v1
kind: Service
metadata:
  name: website
spec:
  ports:
  - port: 80
    targetPort: 80
    protocol: TCP
    name: http
  selector:
    app: website
Then, run “kubectl create -f my-application.yaml” to submit these resource definitions to the cluster. If you already have these from the previous Istio tutorial, simply clean up old resources by running kubectl delete on the old files that were used for deployment, because this tutorial we will be using different routing rules and old ones will interfere with the new setup.
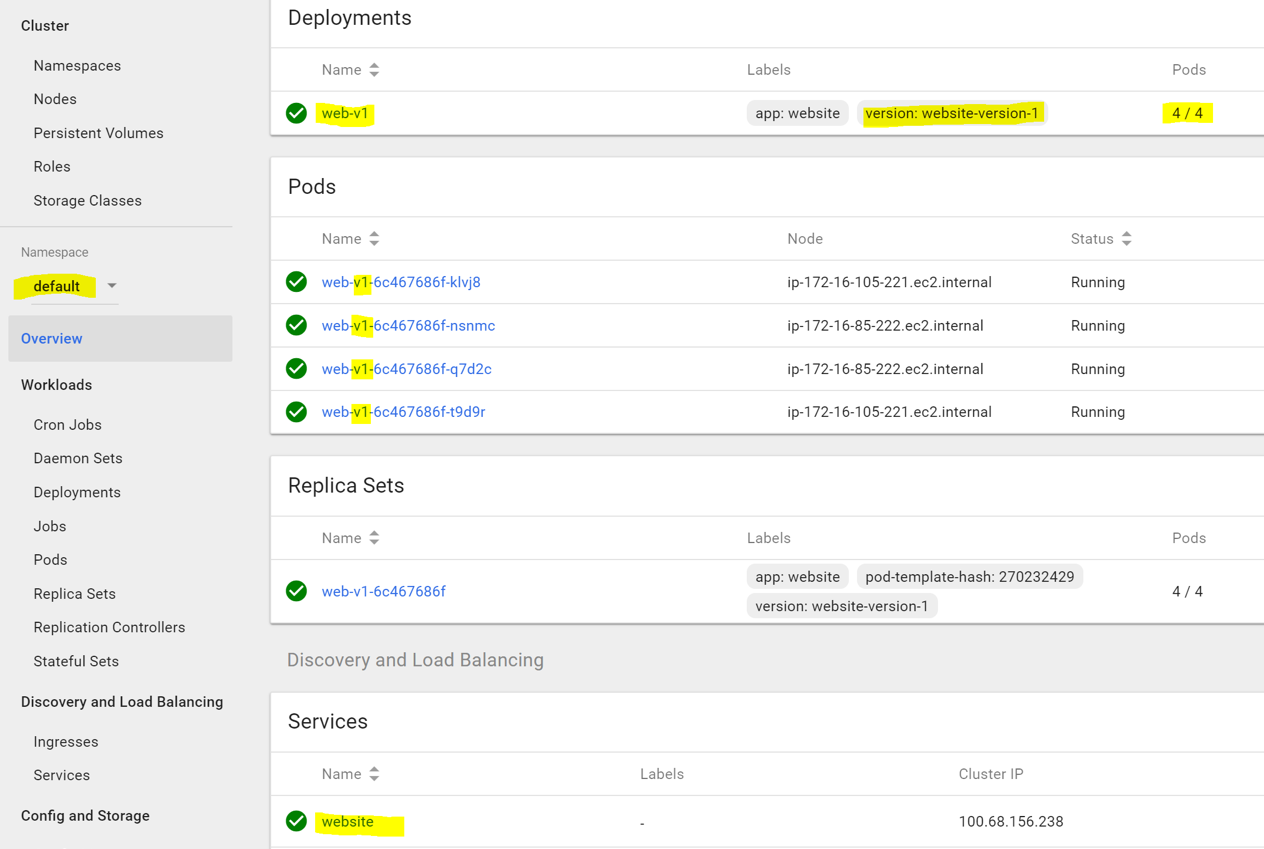
Check to see that the deployment and service was created in the dashboard:
Before releasing the next version, we want to prepare the Istio service mesh to route most of the requests to version-1, and send only specific ones to version-2. We can do so by creating a default route pointing to version-1 only and create additional rules based on HTTP headers, that will cause the Envoy proxy sidecar (which is automatically added to any deployment we submit) to route specific requests to pods with the different version of the application.
Create , Istio Gateway and Virtual Service for the basic functionality of the service mesh ingress endpoint, so that we can access our application through the Istio-Ingress load balancer, which was created when you deployed Istio to the cluster, and save the definitions to “istio-access.yaml”:
---
apiVersion: networking.istio.io/v1alpha3
kind: Gateway
metadata:
  name: website-gateway
spec:
  selector:
    istio: ingressgateway
  servers:
  - port:
      number: 80
      name: http
      protocol: HTTP
    hosts:
    - "*"
---
apiVersion: networking.istio.io/v1alpha3
kind: VirtualService
metadata:
  name: website-virtual-service
spec:
  hosts:
  - "*"
  gateways:
  - website-gateway
  http:
  - route:
    - destination:
        host: website
Now deploy with “kubectl create -f istio-access.yaml.” If you followed the previous tutorial, you may notice that this time we have no “subset” defined under “VirtualService” destination because we are deploying only one version now, and not yet ready to create routing rules.
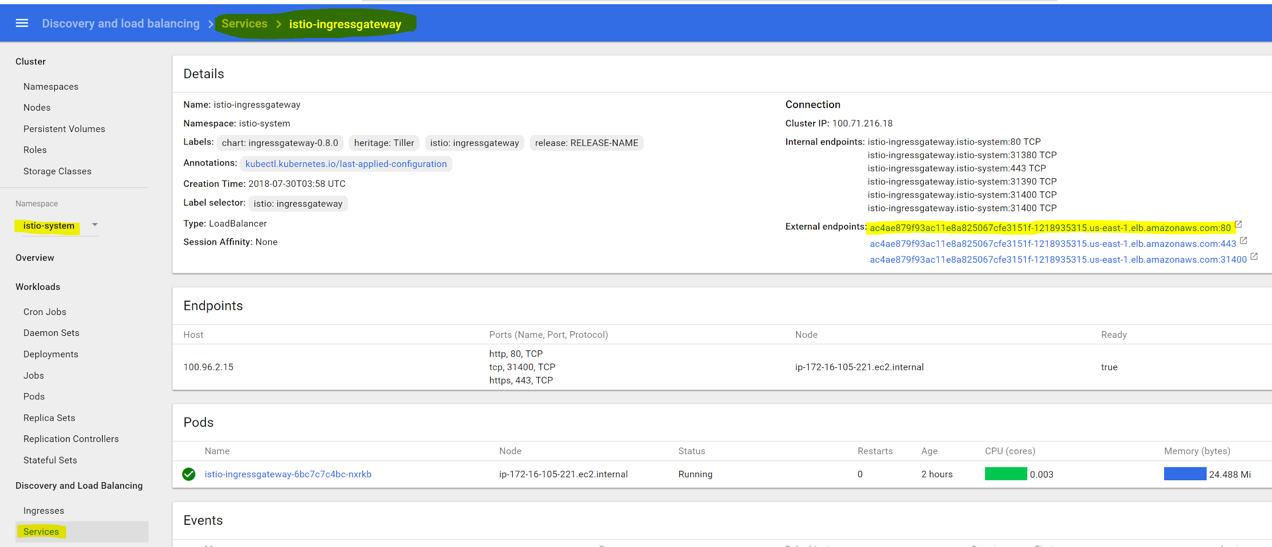
Test access through the endpoint of Istio ingress gateway. You can find the endpoint in “istio-system” namespace services list:
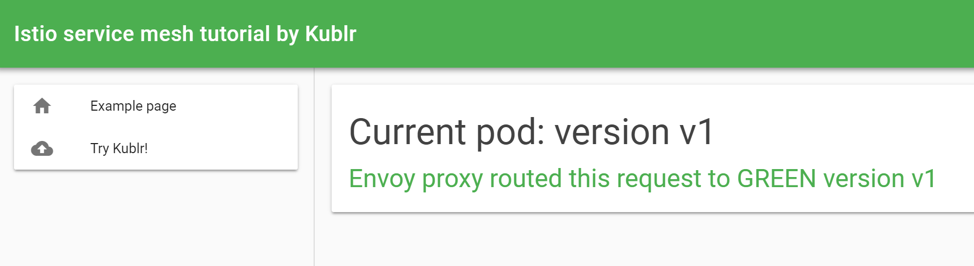
You should see the “version-1” of the demo application when navigating to the endpoint, because it’s the only one deployed, and the only one available for routing in “VirtualService”:
Let’s break down the steps your request passed through before reaching the “version-1” pod:
- External load balancer passed the request to the istio-ingressgateway service. Our “website-gateway” is configured to intercept any requests (hosts: “*”) and route them.
- The “VirtualService” is a link between the gateway and destination pods of any request, any “host” (DNS name or Kubernetes DNS name when services address each other inside the cluster) can be defined only in one VirtualService. At the moment our VirtualService applies its rules on all requests (hosts: ”*”), so it routed the received request to the single destination it has: “website-version-1”.
The host field in the “VirtualService” destination is a name of the Kubernetes “service” object to use. Destination can be divided into subsets, if we want to distinguish between our pods by label and address them in different scenarios separately (with URI path based or HTTP header based routing). In this case, we need to add a subset field like this:
  http:
  - route:
    - destination:
        host: website
        subset: something-that-is-defined-in-DestinationRule
“Subsets” for routing are defined with “DestinationRule.” In addition to label-based separation of target pods of a service, we can apply a custom load-balancing policy. If, for example, we have a subset “version-1” defined like this:
---

apiVersion: networking.istio.io/v1alpha3
kind: DestinationRule
metadata:
  name: website
spec:
  host: website
  subsets:
  - name: version-1
    labels:
      version: website-version-1
This will route to any pod which label “version” equals to “website-version-1” when a “VirtualService” uses the destination service name that we defined here in “spec.host” field (it is the Kubernetes “service” object name, the one we used in “spec.http.route.destination.host” field of “VirtualService”).
Please note that the “spec.gateways” field of “VirtualService” in our example does not contain the “mesh” keyword, which would cause internal traffic within the mesh to obey the defined rules. In our case, we are setting up rules only for external traffic, which passes through the gateway. If the rules are defined for both internal traffic (between microservices, that address each other and access through the service mesh) and external, the definition section of “gateways” should look like this:
...
spec:
  hosts:
  - "*"
  gateways:
  - website-gateway
  - mesh
The term “mesh” is a reserved keyword, versus “website-gateway” which is our custom name of Gateway.
The next step is to prepare the service mesh for the deployment of a new version of the website. Let’s assume that this is a production cluster with real traffic flowing in, and “website-version-1” is active, and we have four pods that receive traffic. By creating a separate deployment, with version-2 of the website pod, and same label “app: website”, we will cause traffic to split and will impact existing users, which we want to avoid! As a reminder, our “service” resource looks like this:
kind: Service
metadata:
  name: website
spec:
  ports:
  - port: 80
    targetPort: 80
    protocol: TCP
    name: http
  selector:
    app: website
Any pod with the label “app: website” will get the traffic through this service – and it’s the only “service” we point to in the Istio “VirtualService” definition – regardless if the label “version” exists or not and what its value is.
Now, we need to create service subsets, before deploying the new pod versions. The moment a new pod goes live (“version-2” canary) all Envoy data plane proxies (sidecars) and Istio ingress will already know where not to route the current flowing production traffic, because we will define that only pods labeled with “version: website-version-1” will receive the usual requests, not marked by our custom HTTP headers (that will be used in real life scenario by QA teams to test the canary release within production cluster environment.
For the sake of learning we will first create a partial “DestinationRule” which only defines a single subset (“version-1” only), deploy version-2 pods, and after testing that the subset rule works, and protects users from getting the “version-2” website, we will update the “DestinationRule” with new setting that will allow us to access “version-2” with custom HTTP header.
Save the following to a “website-versions.yaml” file:
---
apiVersion: networking.istio.io/v1alpha3
kind: DestinationRule
metadata:
  name: website
spec:
  host: website
  subsets:
  - name: version-1
    labels:
      version: website-version-1
Now, deploy with “kubectl create -f website-versions.yaml”. By doing that we created a “subset” of “website” destination, named “version-1”. That subset, is any pod with “version: website-version-1” label and any other labels that are defined in “website” service definition (which is “app: website”).
Let’s create few “version-2” pods, our canary deployment of a new, possibly buggy, version that we don’t want users to see but we must test in a real production environment.
Save the following into a “version-2-deployment.yaml” file:
---
apiVersion: apps/v1beta1
kind: Deployment
metadata:
  name: web-v2
  namespace: default
spec:
  replicas: 1
  template:
    metadata:
      labels:
        app: website
        version: website-version-2
    spec:
      containers:
      - name: website-version-2
        image: kublr/kublr-tutorial-images:v2
        resources:
          requests:
            cpu: 0.1
            memory: 200
What might happen if we deploy “version-2” pod at this stage? Didn’t we prepare the service mesh by creating the “DestinationRule” that routes only to “version: website-version-1” labeled pods? Yes, but remember the subset has to be attached to the “VirtualService” destination, otherwise it is just ignored. The “DestinationRule” resource is nothing but a “record” that can be utilized by “VirtualService”, however, if we don’t include any mention of it in our virtual service definition it is completely ignored. We need to update the virtual service definition, run “kubectl get virtualservices” to list the existing one, and then run “kubectl edit virtualservice website-virtual-service” and add the subset:
...
  http:
  - route:
    - destination:
        host: website
        subset: version-1
Save and exit the file editing mode to apply your modified resource. Test that. At this stage we can still load the website, and refresh few times. Now, deploy “version-2” with “kubectl create -f version-2-deployment.yaml” and check the result in dashboard:
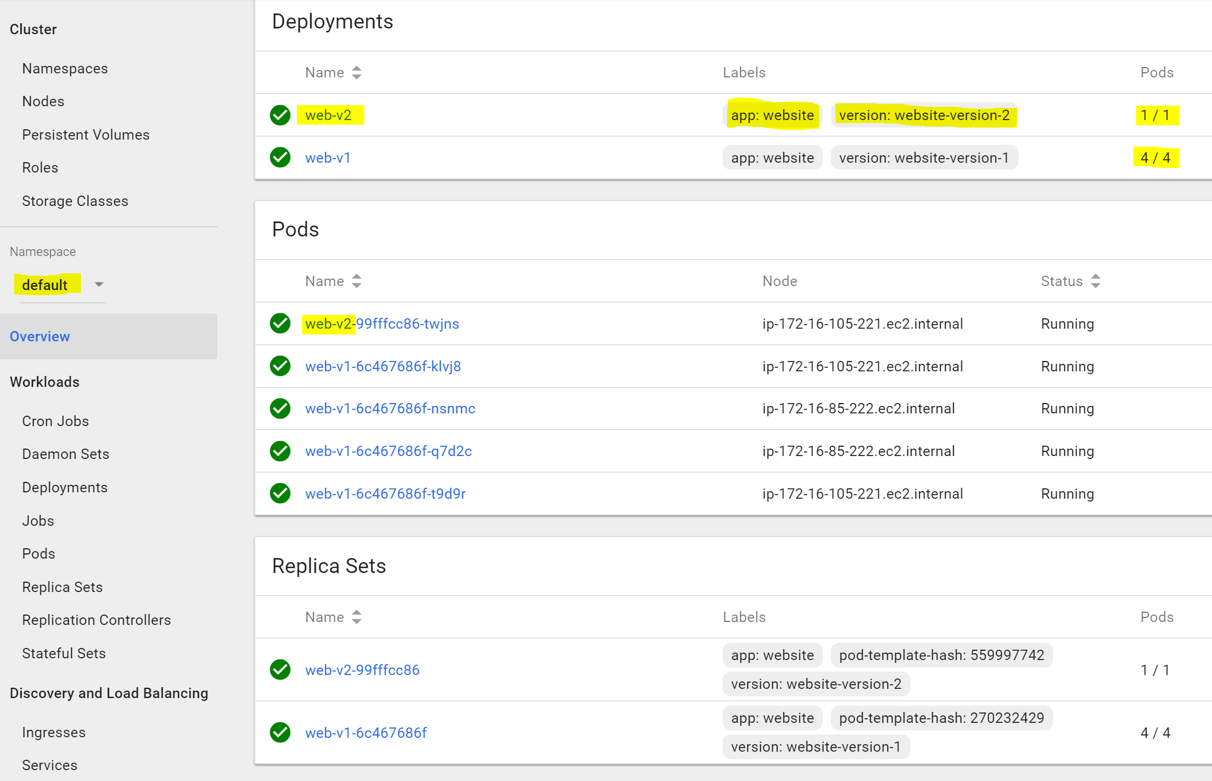
At this point we have four “version-1” pods and one “version-2” canary pod. Refresh the ingress endpoint few times to make sure you are not routed to “version-2”. Now we are ready to modify the routing rules, and send any HTTP request with header “qa” that contains “canary-test” value, to “version-2”.
Edit the “website-virtual-service” again, this time adding the match headers section:
  http:
  - match:
    - headers:
        qa:
          exact: canary-test
    route:
    - destination:
        host: website
        subset: version-2
  - route:
    - destination:
        host: website
        subset: version-1
Save and exit, applying those changes. To complete the setup of “version-2”, we need to do one more thing. As you may have noticed, we added a match rule that uses a destination host “website” with its subset “version-2”, but this subset does not exist. We need to add it into “DestinationRule”. Edit with “kubectl edit destinationrule website” and add the new subset:
spec:
  host: website
  subsets:
  - name: version-1
    labels:
      version: website-version-1
  - name: version-2
    labels:
      version: website-version-2
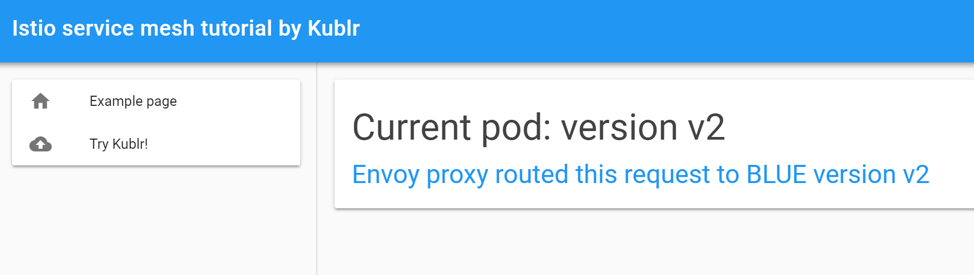
Now “version-2” can be accessed using any tool that supports easily modifying HTTP requests that are sent to a server. You can use Postman, or its Chrome extension, which are the most popular tools for API and HTTP testing, but you will see the result page only as text. So we will use another extension for Chrome called, “Modify Headers for Google Chrome”. After installing and opening the settings by clicking its icon, you can add the custom header that will be added to any page request (and easily turned on and off):

Click the right top “plus” to add a header, fill in the name and value, choose “add” action, then click “save”. Click the “start playing” button in the top left corner (the one which shows “stop” on our screenshot because it is already active), and click the “activate” button in the rule “actions” section on the right. With this setup, load the ingress page again to see the “version-2” blue page!
Using this canary deployment, we have an active pod with a new version of application, residing under same load balancer as all other pods, in the same exact environment (production) where we can perform the needed testing without affecting real users.
What if the application has passed all internal testing and is ready to be revealed to users? If you not ready to do the full deployment of a new version, and want to present it only to small group of users, either pick a particular header that our “client application” already uses on a regular basis (if it’s a mobile client for example that sends its country using headers) and use it as a subset, or choose a different routing strategy, based on the weight of each destination to send an exact percentage of traffic to each version
To test this, try to send 20 percent of traffic to “version-2” and 80 percent to “version-1”, modify the virtual service with “kubectl edit virtualservice website-virtual-service.” It should look like this:
...
spec:
  gateways:
  - website-gateway
  hosts:
  - '*'
  http:
  - route:
    - destination:
        host: website
        subset: version-2
      weight: 20
    - destination:
        host: website
        subset: version-1
      weight: 80
Now try refreshing the page. You will notice that the Blue page (version-2) appears less often than the Green page (version-1). You can try other values and see how it affects the routing.
This concludes the second part of our series of Istio service mesh tutorials. For assistance with other Kublr questions, unique scenarios, and applications, or to provide feedback, please contact a Kublr representative.