
This is a step-by-step tutorial, which shows single master Kubernetes cluster installation, for development, staging, and QA environments. It’s important to note that you don’t have to run production workloads on a single master cluster. Instead, you can use Kublr to create a highly available, multi-master Kubernetes setup on AWS or bare-metal infrastructure (for an overview of Kubernetes architecture, check out this article).
First, create any Linux virtual machine or cloud instance (or bare metal server) and login to the Linux shell. We recommend using latest Ubuntu distro, but CentOS or Amazon Linux is also fine. You will need to install the following packages on the “master” server that will store the state of your cluster and control each worker node:
- Docker container runtime (v1.12+ recommended)
- kubeadm (cluster administration tool that will bootstrap the master components)
- kubelet (the “node agent” that will launch needed Docker containers)
- apt-transport-https (allows usage of HTTPS transport for repositories)
The following is an example of the install process on Ubuntu:
1. Install Docker and the “apt-transport-https” helper package:
apt-get update && apt-get -y install docker.io apt-transport-https
Please don’t confuse the installation package name of “docker.io” with “docker” in this step.
If you install “docker” you will get the “System tray for KDE3/GNOME2 docklet applications” instead of the Docker container runtime that we need. This applies to Ubuntu/Debian distributions. On CentOS and Amazon Linux, you will simply run yum install docker and not “docker.io”.
Also if you have not done so already, make sure Docker is enabled upon boot:
systemctl enable docker.service

2. Import the GPG repository key to protecting yourself against downloading Kubernetes packages that may not be genuine or sourced from potentially fake repositories:
curl -s https://packages.cloud.google.com/apt/doc/apt-key.gpg | apt-key add -
3. Add the official Kubernetes packages repository to your repo list:
echo “deb http://apt.kubernetes.io/ kubernetes-xenial main” | tee /etc/apt/sources.list.d/kubernetes.list
4. Refresh apt-get to see newly available packages, and install “kubelet” and “kubeadm”:
apt-get update
apt-get install -y kubelet kubeadm
Those packages will also install the “kubectl” tool as a dependency, which will be used to control the cluster from the command line.
Now you are ready to initialize the master server with the kubeadm init command, which does the following:
- Generates secret keys and default users (to connect to kube-apiserver and control the cluster using the “kubectl” CLI tool).
- Creates several JSON manifests in /etc/kubernetes/manifests/ folder, each describing one of the master components: etcd, kube-apiserver, kube-controller-manager, kube-scheduler, and their default settings (you can modify any of these later).
Go ahead and run:
kubeadm init --node-name master
Do not worry if it gets stuck for a minute or two on “[apiclient] Created API client, waiting for the control plane to become ready” message. During this stage, kube-apiserver container populates the etcd3 storage with initial values.
If by chance you get stuck, or this doesn’t complete successfully after a minute or two, something may have gone wrong. You can check for clues or signs of trouble in /var/log/syslog and also do a complete stack reset by running kubeadm reset if all else fails.
Once initialization has completed, you should see something similar to the following screenshot:
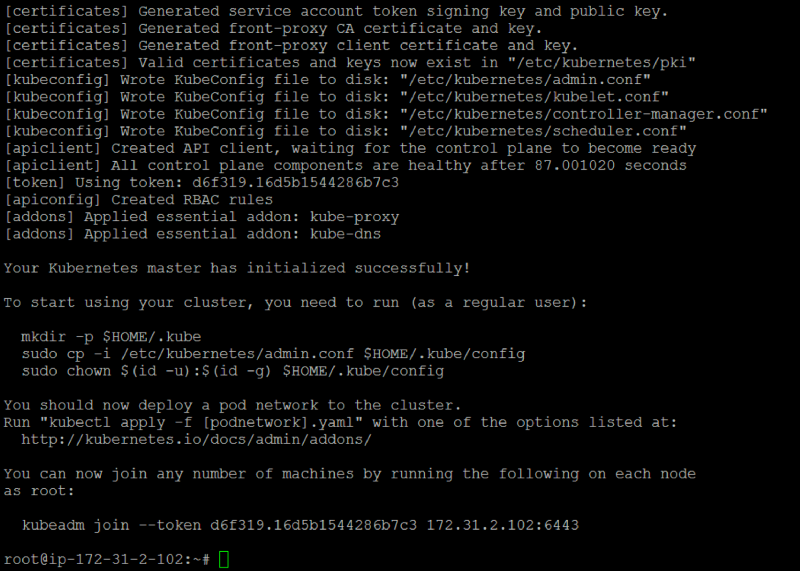
The most important output of this command is the “join token” that you will use to connect worker machines to the master:
kubeadm join --token d6f319.16d5b1544286b7c3 172.31.2.102:6443
The IP address 172.31.2.102 is your Kubernetes master node IP. In our example, we follow the best practices and use an internal range IP, you should try to avoid connecting your worker nodes to the master using its public IP address.
To control which network interface and IP address should be used to connect to the master node (in case you have several IPs available, including the public IP on AWS, for example) you can specify this argument to the kubeadm init command:
kubeadm init --apiserver-advertise-address=<your-other-ip-address>
Now we can activate the “kubectl” command line utility by providing it with needed credentials to the master’s API. Run the following to create a local folder and copy the credentials file:
mkdir -p $HOME/.kube
 cp -i /etc/kubernetes/admin.conf $HOME/.kube/config
 chown $(id -u):$(id -g) $HOME/.kube/config
Before we connect any worker nodes, the next step is to launch an overlay network plugin.
In this example we will use the Weave plugin, which is responsible for automatically updating iptables rules to securely isolate pods from each other based on namespaces and labels.
export kubever=$(kubectl version | base64 | tr -d ‘\n’)
kubectl apply -f “https://cloud.weave.works/k8s/net?k8s-version=$kubever"
If everything went smooth, you should see:

Now we have installed the Weave Net plugin that will manage the overlay network communication between all containers in the cluster. It does so by dynamically adding, updating, and removing iptables rules on each node, allowing Kubernetes managed containers to communicate with each other using their unique internal IP addresses, separate from the underlying VM/Cloud network.
For example, your AWS VPC subnet could be 172.18.0.0/16, but all containers in your first Kubernetes cluster connect to each other using 192.168.0.0/24 range, and the second cluster uses 192.168.5.0/24 subnet for all of its containers to communicate. We will not get deeper into details in this article, but overlay networking is an important aspect that you should learn in depth if you want to be capable of maintaining and troubleshooting a production cluster.
At this stage, we should deploy the official dashboard, to visualize our cluster resources.
Run the following to launch a dashboard pod and service:
kubectl create -f https://git.io/kube-dashboard
The “Service” resource will be reachable only from the internal cluster IP, so you should either run kubectl in proxy mode to reach the dashboard on localhost:9090, or modify the service to expose itself on underlying host machine port.
We will expose the port, and reach the dashboard using the external IP in this example, because we’re using AWS instances for this demo and their internal IP addresses are unreachable (though would be possible theoretically if we were to use the AWS VPN).
Run this command to edit the dashboard service YAML definition:
kubectl edit services kubernetes-dashboard --namespace=kube-system
It will open your default terminal editor, in my case ‘vim’. Replace the “ClusterIP” string to “NodePort” (few lines before end of file):
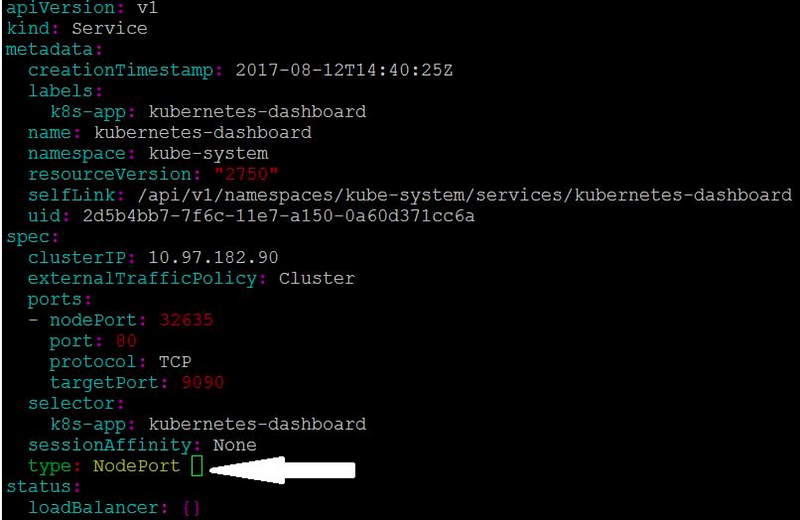
Exit while saving the changes. It will cause the “Service” object of the dashboard (the dashboard consists of a “pod” and “service”, where the pod is the container and the service is the load balancer) to modify its settings, allowing external access to dashboard.
To see which host port was chosen by Kubernetes for the dashboard service once we’ve modified the settings, run:
kubectl describe services kubernetes-dashboard --namespace=kube-system | grep NodePort:
Note the exposed port, in our case “32635”:

This is a random port. While you have the option to manually specify an external port number, this has been omitted for demonstration purposes, to avoid unnecessary difficulties later when running other example pods.
Now, you should be able to navigate to the master node’s host IP and dashboard port, with http://your-ip-or-dns:port
Do not use https, because here we access the dashboard pod directly, and it listens to http and not https protocol by default. The dashboard will show the “default” namespace, and there’s not much to see there yet, so we switch to the “kube-system” namespace (highlighted in yellow on screenshot):
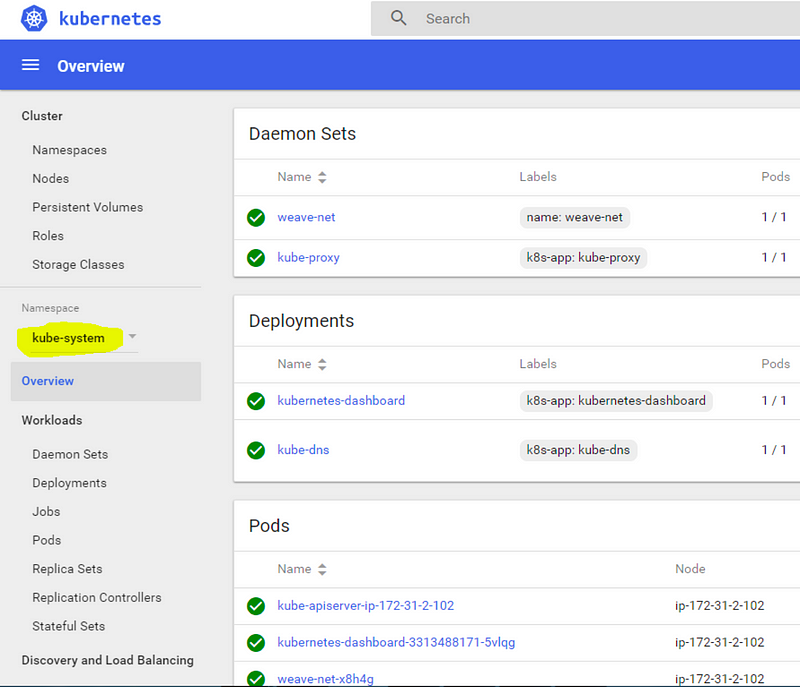
You’ve probably noticed that we still haven’t added any “worker nodes” to the cluster. Up to now, every command has been run on the master. It’s OK to deploy lightweight system services (like the dashboard) on the master, because they usually consume few resources and don’t need to be “distributed” and scaled up to many servers. The “kube-system” namespace (the one we switched to from the dashboard) contains important system pods, services, deployments, and daemon sets like, like the Weave Net plugin that we installed earlier.
In order to deploy other workloads, we need to connect one or more worker nodes, we do so by installing the same packages on another machine (kubelet, kubeadm, docker, etc.), and running the kubeadm join command with the token that we saved from an earlier step when initializing the master node. In the case of this example, the command was:
kubeadm join --token d6f319.16d5b1544286b7c3 172.31.2.102:6443
Successful join looks like this:

Verify the node has joined, on the master server by running kubectl get nodes to see the new machine in cluster:

Repeat the procedure on as many nodes as you need, or automate it easily as a bash script that will run after instance boot.
On AWS, you can put this sequence of commands into “user-data” for example, so any instance that you start will join the cluster automatically on boot.
Now you’re ready to deploy applications and additional Docker images to your cluster.
Please note: this is a single master setup and should not be used in production (you don’t want your entire infrastructure to depend on single master server).
A multi-master node setup is far more complex. It is described in the documentation as being “akin to wearing underwear, pants, a belt, suspenders, another pair of underwear, and another pair of pants.”
The steps described here are barely sufficient to create a stable cluster. There are many nuts and bolts, and tons of moving parts involved, multiplied by all of the unique complexities of the underlying infrastructure. Unfortunately, so much could go wrong in an instant.
Given all of the different version numbers of Docker and Kubernetes, all of the flavors of Linux, and the nuances of each cloud provider, this can be a dizzying and time consuming (and expensive) challenge for even the best DevOps teams.
If you’re interested in maintaining a highly available multi-master node setup with 3, 5 or even 7 master nodes (and without keeping your DevOps team busy troubleshooting esoteric issues, especially during Kubernetes version updates), you can do so using either the Google Container Engine (GKE) on the Google Cloud Platform, or Kublr running on AWS.
Kublr is an easy-to-use, well-tested platform for creating and maintaining highly available Kubernetes clusters.
In a matter of minutes, you can:
- Spin up a new cluster in any AWS region
- Setup cluster logging to ElasticSearch\Kibana
- Perform metric collection via InfluxDB\Grafana
- Enable autoscaling for worker nodes
- Initialize the latest Tiller\Helm Kubernetes package manager
- Handle background initialization steps automatically
All of that, and it can manage your backups, too.