
One of the advantages of using an advanced container orchestration tool like Kubernetes is the flexible scheduler. This provides a wide range of options for users to specify conditions for assigning pods to particular worker nodes that satisfy a condition, and not just based on available resources of the node. In order to explain how Kubernetes makes decisions about placing pods on correct hosts, we can look at the following simplified diagram of a Kubernetes master and a few of its components:
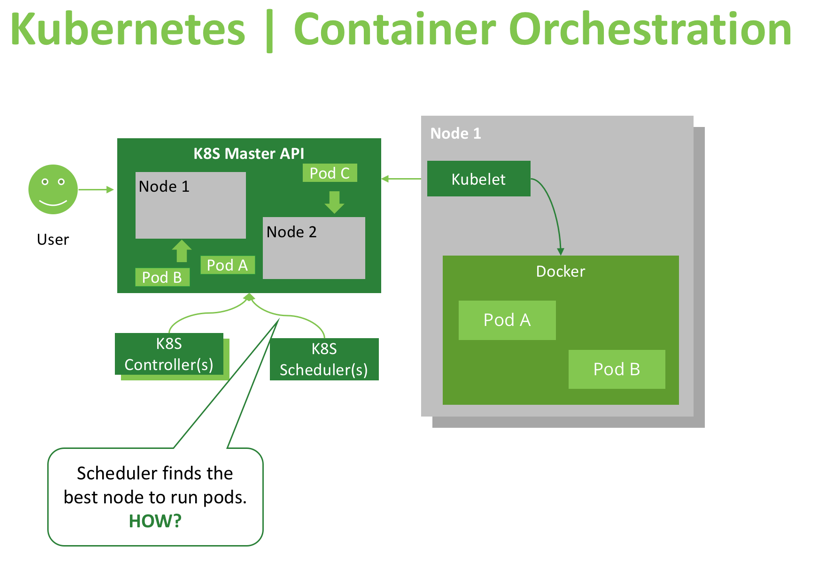
The master API (kube-apiserver) is an instrument that provides read/write access to the cluster’s desired and current state. Components like the scheduler can use the master API to retrieve current state information, apply some logic and calculations, and update the API with new information about the desired state (like specifying to which node a new pod will be scheduled, or which pod should be moved to another node). In addition, cluster users and administrators can update the cluster state or view it through the Kubernetes dashboard, which is a UI that provides access to the API. CI/CD pipelines can also create new resources or modify existing ones using the API.
Other important consumers of the API are node agents named “kubelets,” which manage the container runtime (usually Docker) on worker nodes. When a Kubelet recognizes discrepancies between the reported desired state and the actual state of its host, it will run or terminate the needed containers to reach the target state described by the master API. Kubelets are frequently querying APIs, or watching them for changes, which is why Kubernetes’ response to updates and changes is almost immediate (a matter of seconds).
As we can see, Kubernetes uses controller patterns to maintain and update cluster state, and the scheduler controller is solely responsible for pod scheduling decisions. The scheduler constantly watches the Kubernetes API for unscheduled pods, and when such pods are found, makes a decision on which node the pods should be scheduled/placed.
The scheduler’s decision to start a new pod goes through these three stages:
- Node filtering
- Node priority calculation
- Actual scheduling operation
At the first stage, the scheduler will check which nodes are compatible with running this workload. It does so by running all nodes through a set of filters and removing those, which are not compatible from consideration. The following filters are used:
Volume filters
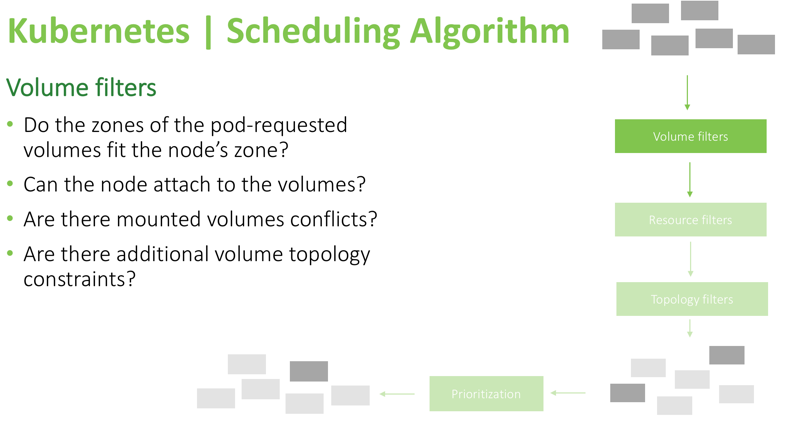
Using these checks, the scheduler knows in advance which nodes can’t run the pod, so it will remove those nodes from the list of possible targets. For example, is the data volume required by the pod in the same availability zone as the node? Can it be attached without conflicting with the underlying cloud provider rules? (In AWS, for example, it’s impossible to attach an EBS volume from one availability zone, to a node in another zone). Also, the volume topology constraints that were specified during volume definition need to be satisfied (a volume requested by a pod might have a “node-affinity” constraint that only allows it to attach to a specific set of nodes, or specifically prohibits it from attaching to some nodes).
Next are resource filters:
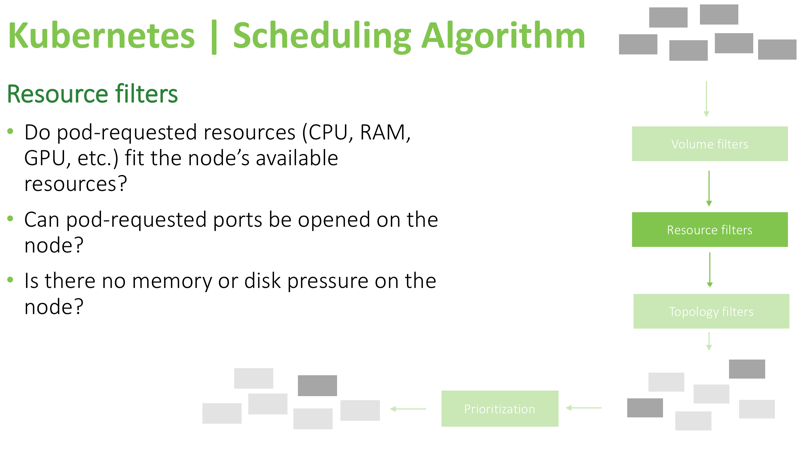
These filters above are pretty straightforward. The scheduler will check if the resources requested by the pod are available, ensure that there is no pressure on the node, like low memory or low disk space, and confirm whether requested ports can be opened on the node. For example, if the pod specified that it needs to bind to host port 8080, but another pod with similar requirements is already occupying that port on a worker node, the node will be removed from consideration and will not be a candidate to run that pod.
The last set of filters is affinity selectors:
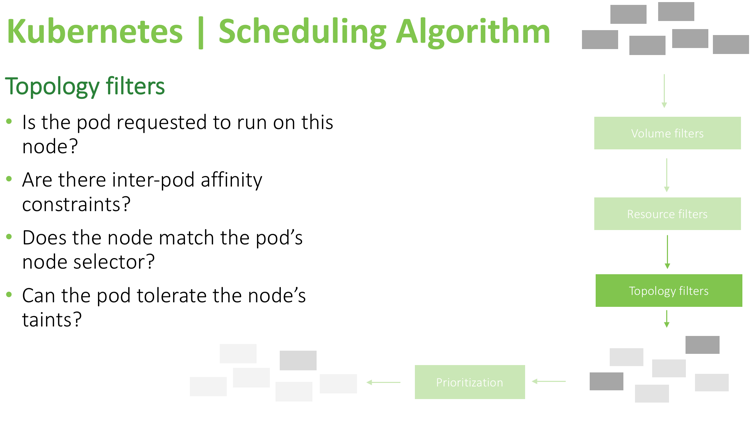
In this example, you can see that the scheduler verifies if the pod explicitly stated it needs to run on particular nodes or if it specifies pod-affinity (if it needs to run only when some other pods are present or avoid running on the same node with specific pods). Also, this filter checks to see if the pod can tolerate a node’s taints and node conditions like dedicated_gpu/maintenance/staging_only (an example of custom user-defined taints), or memory-pressure/unreachable/disk-pressure (an example of system-applied taints). Tolerations are specified in the pod definition and allow a pod to be scheduled on nodes with some specific taints. In other words, all other pods will be denied from scheduling or executing on a node, except the pods which explicitly state that they are allowed to run there. You can read more about taints and tolerations here. These are important mechanisms to fine-tune the scheduling behavior of Kubernetes.
After these filtering steps are completed, there is a chance that no available nodes for this pod will be found. In that case, the pod will remain unscheduled, and it will be reflected in the dashboard including the reason for failure to run the pod (for example, “nodes that can satisfy this pod constraints are not found” or “there is not enough memory to schedule the pod”). If the filtering stage left you several nodes to choose from, the scheduler will run a prioritization check based on the following parameters:
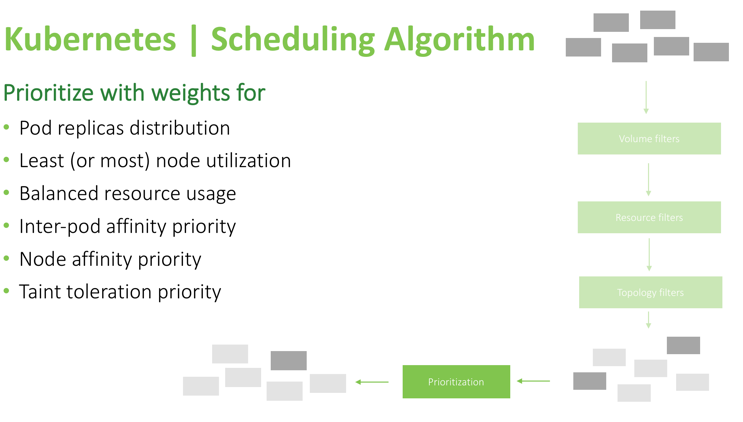
After this check is completed, the scheduler calculates a score for each node, and the highest scoring node will run that pod.
Below is a list of methods to control placement of pods during pod definition, sorted by complexity from basic resource requirements to advanced methods like using a custom scheduler controller:
Scheduling Controlling Pods Destination
- Specify resource requirements
- Be aware of volumes
- Use node constraints
- Use affinity and anti-affinity
- Scheduler configuration
- Custom / multiple schedulers
The first basic method to help the scheduler make the right decisions is setting memory/CPU requests and limits. Requests are used during the scheduling stage, and limits are used when the pod is already running (Limits determine the pod QOS level. You can read more about cluster rebalancing mechanisms and pod evictions in our in-depth article here).
We can avoid issues with volume compatibility following these basic rules:
- Make sure requested volumes are in the same availability zone as the desired nodes. For example, when you have a set of nodes in zone “A” where you want a pod to run, and a volume in zone “B” where you need to use that same pod, first make sure to clone those volumes into the correct zone where the needed nodes reside, or spin up a few new nodes in the zone where that special volume resides, so it can be attached to these nodes.
- Make sure the node didn’t reach its volume limit (for example in Azure cloud there is a limit of how many volumes can be attached).
- Do not specify volumes that are already attached to separate nodes. If a pod needs a few volumes but those are already exclusively attached to another host, that pod will fail to run because the condition of having both volumes mounted cannot be satisfied.
- Use volume topology constraints, by specifying a list of nodes where a volume can or cannot be attached.
Also, we have several constraint options available that should be specified in the pod definition:
- Directly set a nodeName where this pod should run.
- Use nodeSelector to specify labels that a node should possess to be able to run the pod.
- Taints (on the node) and tolerations (on pods) – As mentioned above, taints are indicators of node condition; no pods will be scheduled on a tainted node unless they specify “toleration” for that type of taint. A node can have multiple taints, and a pod can have multiple tolerations.
The following image illustrates taint types and an example toleration definition:
Scheduling Controlled | Taints
Taints communicate node conditions
-
Key – condition category
-
Value – specific condition
-
Operator – value wildcard
- Equal
- Exists
-
Effect
- NoSchedule – filter at scheduling time
- PreferNoSchedule – prioritize at scheduling time
- NoExecute – filter at scheduling time, evict if executing
-
TolerationSeconds – time to tolerate “NoExecute” taint
kind: Pod
spec:
  tolerations:
  - key: <taint key>
    value: <taint value>
    operator: <match operator>
    effect: <taint effect>
    tolerationSeconds: 60
The next constraint mechanisms are affinity preferences that can be set in the pod definition. Affinity has two scopes at the moment and is a feature still in development. Only scheduling stage affinity is available now, as illustrated below:
Scheduling Controlled | Node Affinity
Scope
- Preferred during scheduling, ignored during execution
- Required during scheduling, ignored during execution
kind: Pod
spec:
  affinity:
    nodeAffinity:
      preferredDuringSchedulingIgnoredDuringExecution:
      - weight: 10
        preference: { <node selector term> }
      - ...
      requiredDuringSchedulingIgnoredDuringExecution:
        nodeSelectorTerms:
        - { <node selector term> }
        - ... v
When you use the “preferred during scheduling” option, Kubernetes will do its best to schedule the pods following that setting. If “required during scheduling” is used, it will force that condition and will not run the pod on a node unless that condition is satisfied.
There are several different ways to specify the pod preferences for the nodes on which to run. A simple preference, familiar to many, is a “node selector” (specify particular label directly) that will cause that pod to be scheduled only on these nodes that have an exact label value. Another way of specifying node preference is by using node affinity with “node selector terms,” which allows usage of operators like those shown on the bottom part of the image below. This allows users to specify a flexible set of rules, based on which the decision to schedule or avoid scheduling will be made.
Interlude | Node Selector vs Node Selector Term
...
nodeSelector:
  <label 1 key>: <label 1 value>
  ...
...
<node selector term>:
  matchExpressions:
  - key: <label key>
    operator: In | NotIn | Exists | DoesNotExist | Gt | Lt
    values:
    - <label value 1>
    ...
  ...
Unlike node selector’s strict label matching, more flexible match expressions may be used in affinity rules’ node selector term. Match expression operators can be used to compare a label value to a list of possible variations (“In” operator), or to check that a label value is not one of the values in a specified list (“NotIn”). Additionally, they can determine if a label exists or does not exist on a node with no regard to its value. Finally, they can compare numerical values of a label with the operators “Gt” (greater than) and “Lt” (less than). Here is another example of node affinity rules:
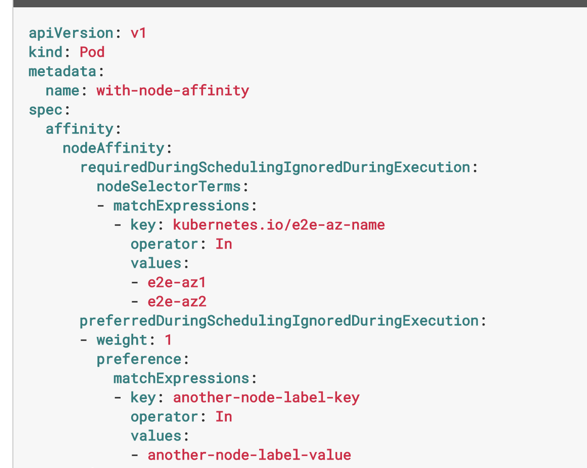
You can see, this set of rules requires a node to have the label “kubernetes.io/e2e-az-name” with a value indicating the availability zone as either “e2e-az1” or ”e2e-az2”. The rules also prefer a node that has the custom label “another-node-label-key” with the value of “another-node-label-value”, which means if a node exists that satisfies both constraints, it will be the most preferred candidate to run that pod.
In addition to node affinity settings, there are inter-pod affinity and anti-affinity settings that are defined below:
Scheduling Controlled | Inter-pod Affinity
Scope
- Preferred during scheduling, ignored during execution
- Required during scheduling, ignored during execution
kind: Pod
spec:
  affinity:
    podAffinity:
      preferredDuringSchedulingIgnoredDuringExecution:
      - weight: 10
        podAffinityTerm: { <pod affinity term> }
      - ...
      requiredDuringSchedulingIgnoredDuringExecution:
      - { <pod affinity term> }
      - ...
Using these rules, you can control the placement of pods beside each other. Some pods might accept being co-located with other types of pods, while others may need to avoid being placed onto the same machine with specific types of pods (like CPU intensive pods, which will cause bad performance for mission-critical workloads that Kubernetes might schedule on the same node).
Here is an example of inter-pod affinity rules:
- Pod “B” must be running on a node in order for this pod “A” to be scheduled there.
- Prefer a node where pod “B” is running, otherwise, run on any node.
While this example shows inter-pod anti-affinity rules:
- If pod “B” is running on that node, do not schedule
- Prefer a node where pod “B” is not ruining, otherwise run on any node.
Below is an additional example that introduces topologyKey, which is a label selector that will define that label key as “co-location indicator.” In order to distribute the pods evenly across the cluster, a scheduler will try to choose nodes with different values of the topologyKey label on these nodes. In order to “stack pods as close as possible with one another” (such scheduling preference also exists and is described in next step) it can base the decision on that topologyKey label again, this time preferring nodes which have the same label value.
Scheduling Controlled | Pod Affinity Terms
- topologyKey – nodes’ label key defining co-location
- labelSelector and namespaces – select group of pods
<pod affinity term>:
  topologyKey: <topology label key>
  namespaces: [ <namespace>, ... ]
  labelSelector:
    matchLabels:
      <label key>: <label value>
      ...
    matchExpressions:
    - key: <label key>
      operator: In | NotIn | Exists | DoesNotExist
      values: [ <value 1>, ... ]
    ...
In addition to the described methods, there are other ways of modifying the behavior of the Kubernetes scheduler, such as setting a different scheduling algorithm using flags passed to the “kube-scheduler” component (which is one of the master components of Kubernetes that runs on master nodes). The two available options for the “–algorithm-provider” flag are: “DefaultProvider” and “ClusterAutoscalerProvider.” The “DefaultProvider” tries to distribute the pods across the cluster to evenly balance the load for all nodes. And the “ClusterAutoscalerProvider” will attempt to stack the most pods per node for better resource utilization (which is used usually when the underlying worker nodes are auto-scaled based on consumed resources like CPU and Memory).
In addition to algorithm provider modification, there’s an option to provide your own scheduling “logic” using a policy defined in a ConfigMap or file, using these flags:
Default Scheduler | Custom Policy Config
kube-scheduler
--config=<file>
--policy-config-file=<file>
--use-legacy-policy-config=<true|false>
--policy-configmap=<config map name>
--policy-configmap-namespace=<config map ns>
This allows you to pass a customized policy to the scheduler and is a very advanced feature documented only on GitHub (not even present in official documentation on the Kubernetes’ website). However, if hacking Kubernetes in-depth is your thing, you can find more information on the linked page on GitHub and read an example policy file here. Each available parameter for that policy determines the flow of the algorithm and the rules that lead to a decision about where the pod should be placed. It is described in this document. In order to put your policy in file, specify “–use-legacy-policy-config=true” + “–policy-config-file”. Otherwise, use the config map and config map namespace flags to specify the target config map to use as the policy.
One more way to customize the scheduling, either for specific pods or cluster wide, is to use your own scheduler, which you can write in any language. All you need to do is to use the API as in the following basic example:
Scheduling Controlled | Custom Scheduler
Naive implementation
In an infinite loop:
-
Get list of Nodes:
/api/v1/nodes -
Get list of Pods:
/api/v1/pods -
Select Pods with
status.phase == Pendingand
spec.schedulerName == our-name -
For each pod:
- Calculate target Node
- Create a new Binding object:
POST /api/v1/bindings
In the example above, the custom scheduler will need to fetch nodes and pods through specified APIs, then select pods with “phase=Pending” and “schedulerName=your-scheduler-name”. After calculating where it needs to place each pod, the scheduler will create a Binding object (for calculating the best fit target node you can use all information found in pod definitions and node definitions, like annotations, labels, Docker image names, volumes, or any information that can contribute to determining the right placement for the pod according to your requirements).
To better implement a custom scheduler you should watch the nodes and cache the information for faster calculation. A good starting point would be to fork the current scheduler, as it provides a good starting point for a custom additional logic and functions.
We hope you found this post useful, feel free to ask questions in the comments below. Our engineers will be more than happy to shed more light on the less obvious topics like custom scheduling policies or customized scheduler implementations.